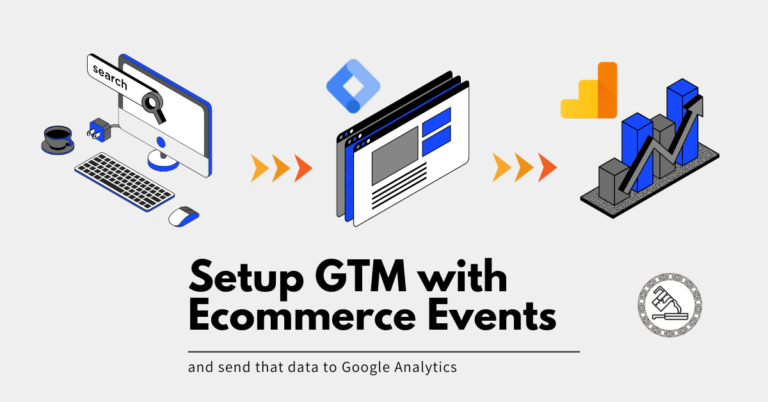
The website sends the ecommerce data to the data layer. GTM is set up on your website and now reads all this information.
But how would GTM know which information to work with?
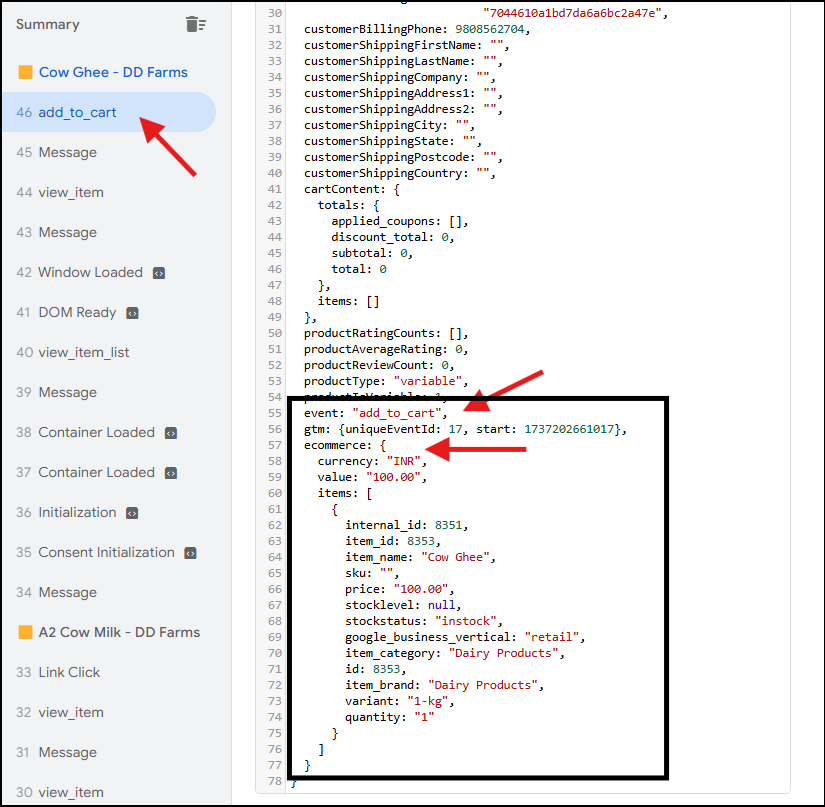
GTM has a big bucket of data with so much information that we need to configure it to read and act on some of it.
That’s where the three most important elements (for our purpose) of GTM come into play:
- Data Layer Variables
- Tags
- Triggers
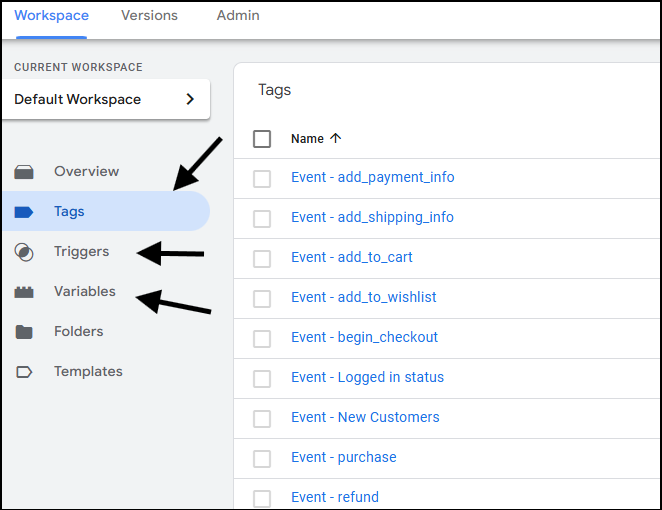
1. Data Layer Variables
We configure GTM to read the variable name from the data layer and store its value. This data layer variable can then be used in multiple ways, such as sending information and an event to Google Analytics.
We can also use this variable’s value as a condition for some other information to be sent to Google Analytics.
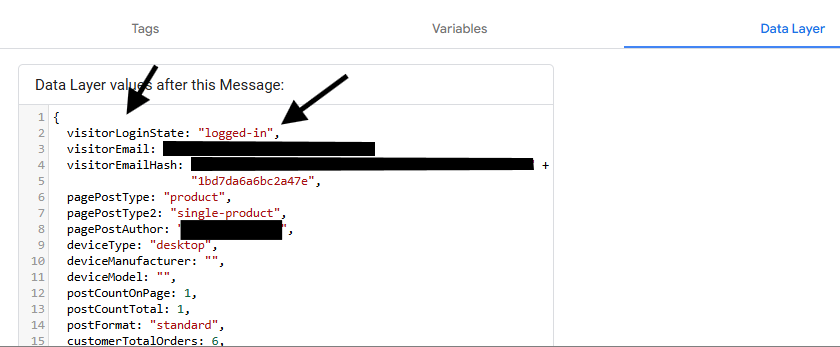
Not going into actual technical terms, the above image is from the data layer tab of GTM preview mode
Consider the first line here:
visitorLoginState: "logged-in"
visitorLoginState is the variable name here. The value of this variable here is logged-in.
Now, to let GTM know, we set up this data layer variable in GTM to read and capture its value
1.1 Set up Data Layer Variables in GTM
Go to the Variables section from the left sidebar of your GTM account.
Scroll to user-defined variables. Click on New.
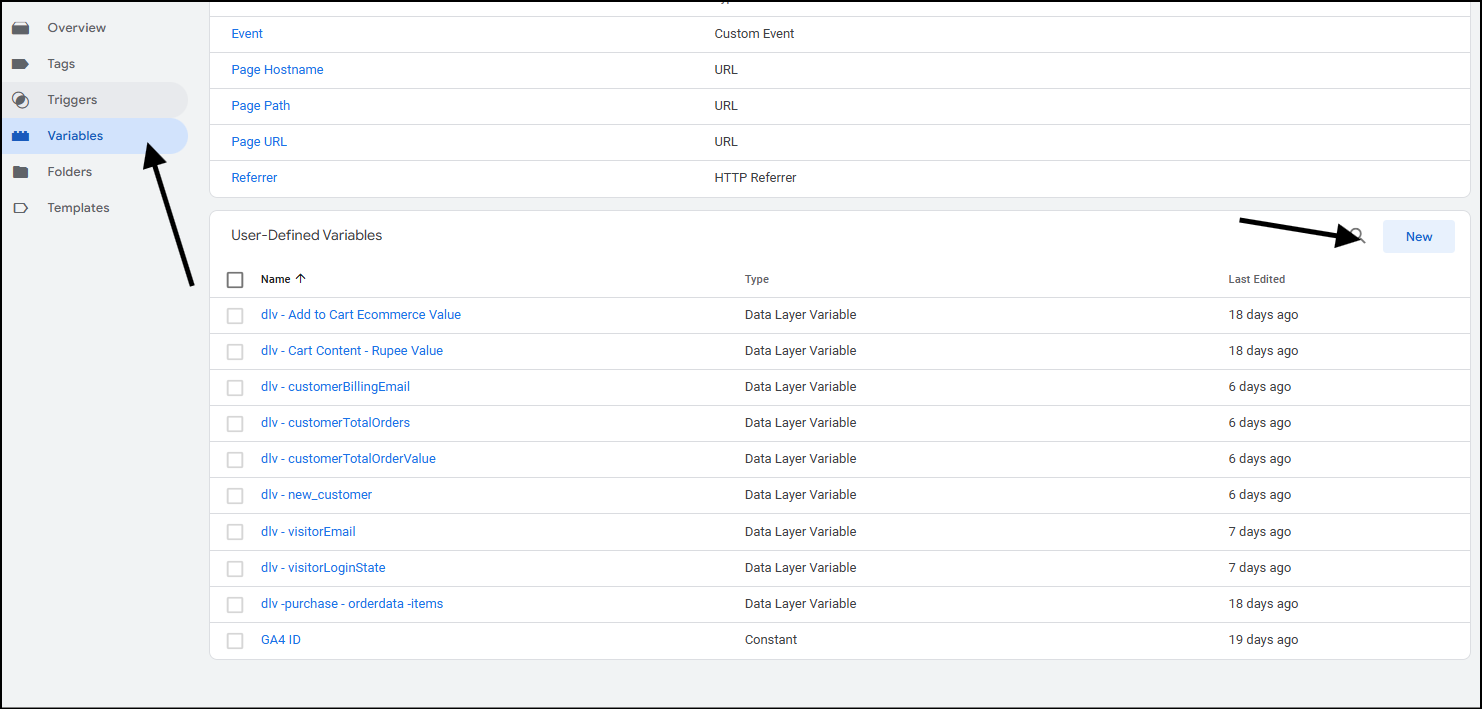
After you hit new, you’ll see a new section slide from the right over on top of the previous one. Name your variable. I’ve learned to start the name of every data layer variable as dlv - variable name from Julius’s tutorials.
For this variable, I named it as dlv - visitorLoginState. In the Data Layer Variable Name field, you need to give the exact name of the variable that appears in your data layer.
From the image above, the variable name is visitorLoginState.
Click on save and submit the container from your workspace to make the changes live.
1.2 Check if GTM can capture the value of the Data Layer Variable
Go to preview mode to check if the data layer variable is being read and captured correctly.
To use GTM preview mode, go to your Google Tag Manager account and select Preview.

In the tag assistant tab that opens up, enter your website (the one where you’ve connected that GTM account). Click on Connect.
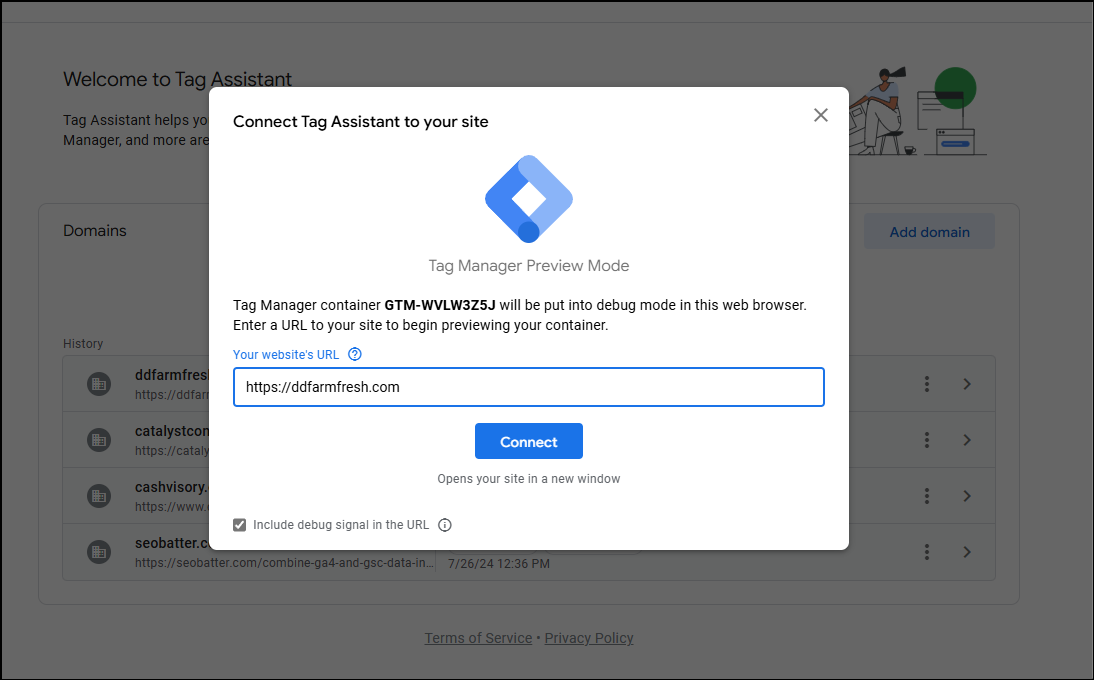
After you hit connect, you’ll either see a new window that opens your website or a new tab.
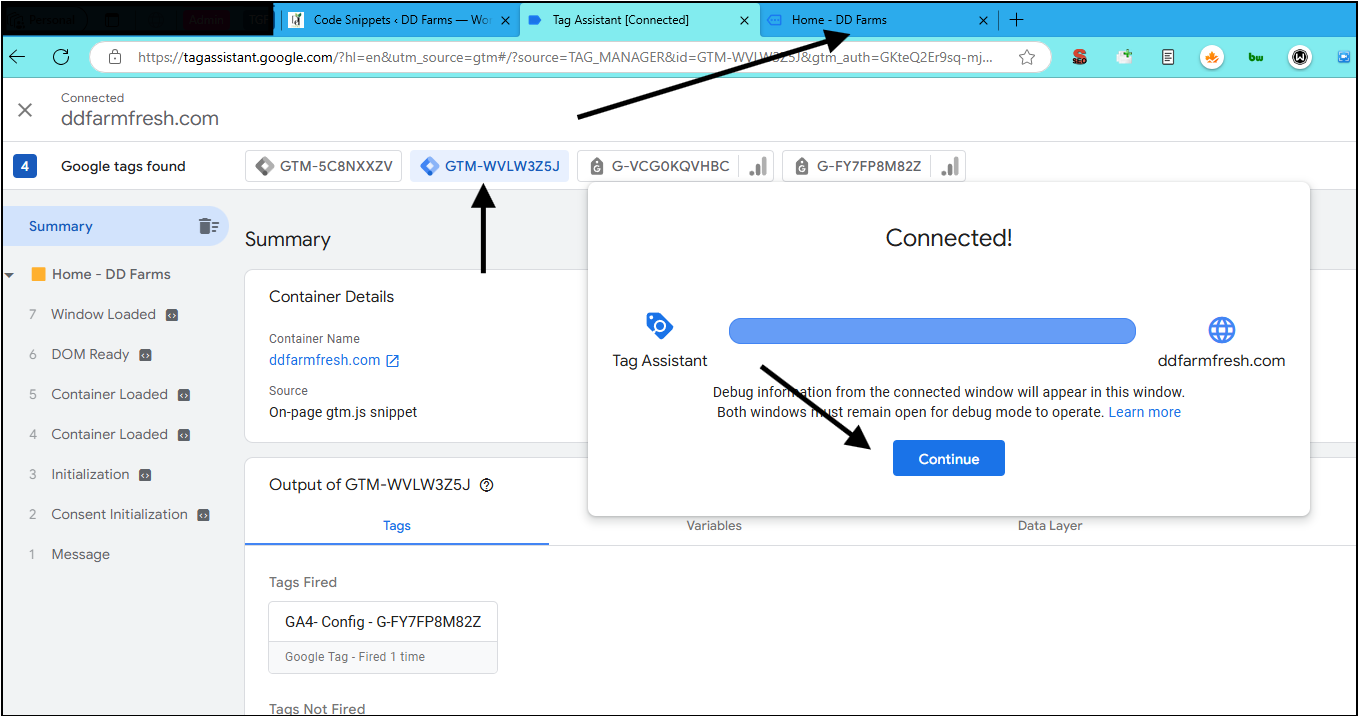
Tip: Make sure your adblockers are off. Sometimes, VPN or other extensions also block ads and tracking scripts, so allow them to see the connection.
Now click continue, and head to the tab where your website is open.
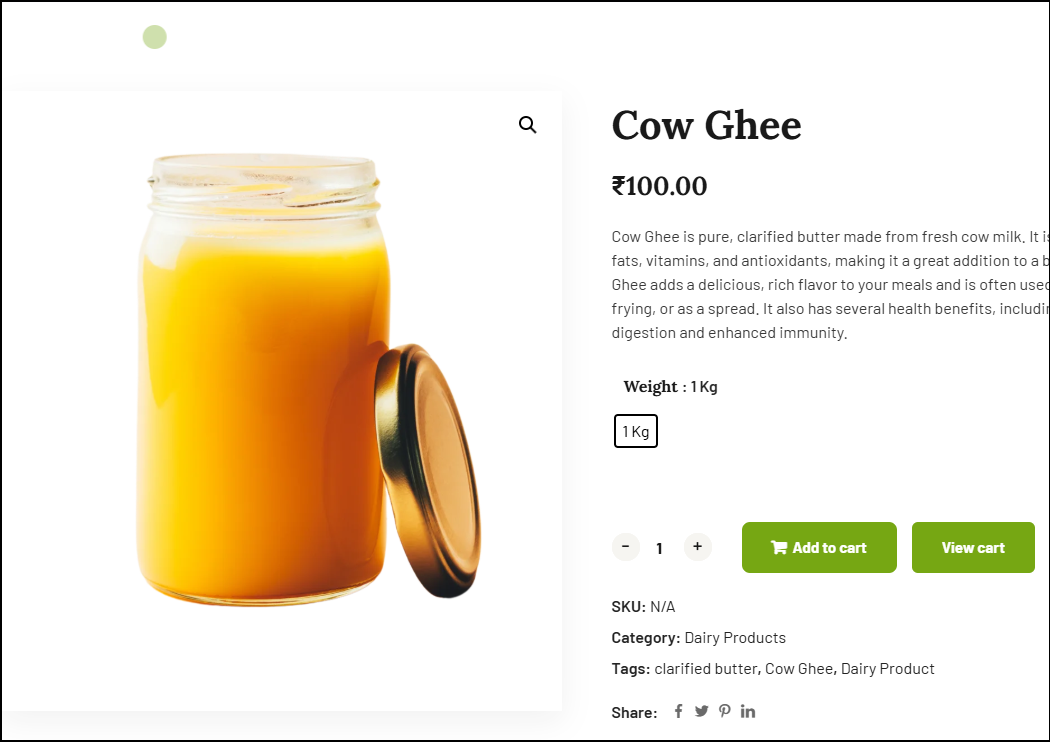
Do a few actions on your site, such as adding a product to the cart.
Head back over to the tag assistant tab. In the left sidebar, you should see the event “add_to_cart.” Click on the data layer tab to inspect the data layer values.
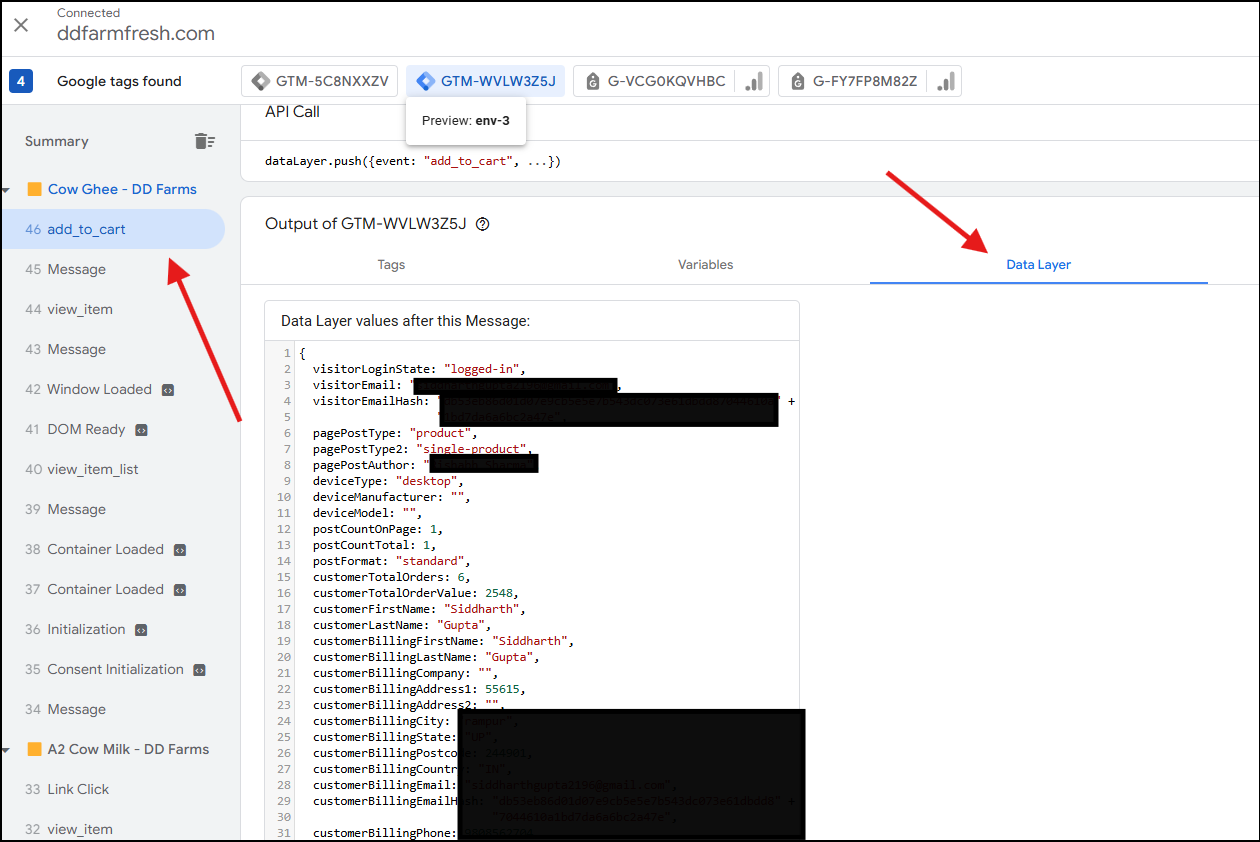
From the Data Layer tab, you can confirm that you can see the variable visitorLoginState: "logged-in" with its value.
To confirm if GTM has identified this variable and captured its value, go to the “Variables” left of the Data Layer tab in the preview mode.
Here, you’ll see all the variables, both default and custom-created. You should be able to see your custom variable name “dlv – visitorLoginState” and its value “logged-in“.
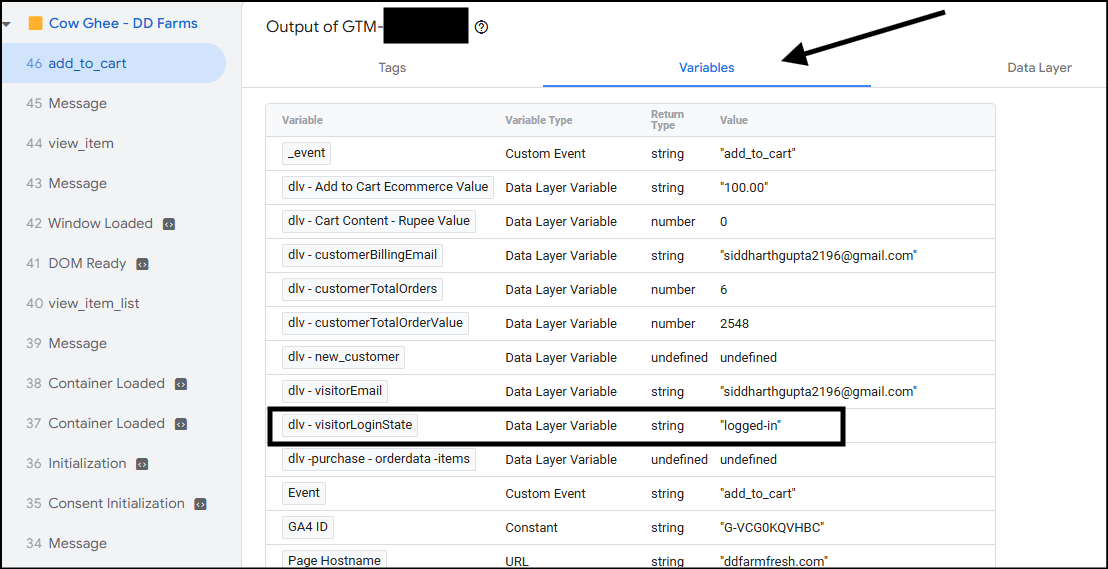
While confirming this, you can also see that GTM states the variable type as Data Layer Variables (because there are multiple other types of variables in GTM) and the return type as a string (text).
Tags are a piece of code that is executed. i.e., We can set up a GA4 event tag, and when the conditions are met, that tag will be fired (code executed). The result of the code execution will be the data sent to Google Analytics.
Let us understand this with an example: You want to see which users on your e-commerce store were logged in when they added a product to the cart. For this, you can send an event to GA4 – add_cart_visitor_login_state. Along with this event, you can also send information about the Visitor Logged In State – Logged in or Logged out.
Now you know from above that we have the following in the data layer:
visitorLoginState: "logged-in"event: "add_to_cart"
You can look at the images shared above to confirm whether these are what you see in screenshots in the data layer tab.
To send an event to GA4, you need a tag. You’ve already taught GTM that visitorLoginState it is a Data Layer Variable and that it needs to capture its value. You can use information in the tag setup.
How to create a GA4 custom event tag in GTM
Go to the Tags section in GTM. Select New.

From the section that opens up:
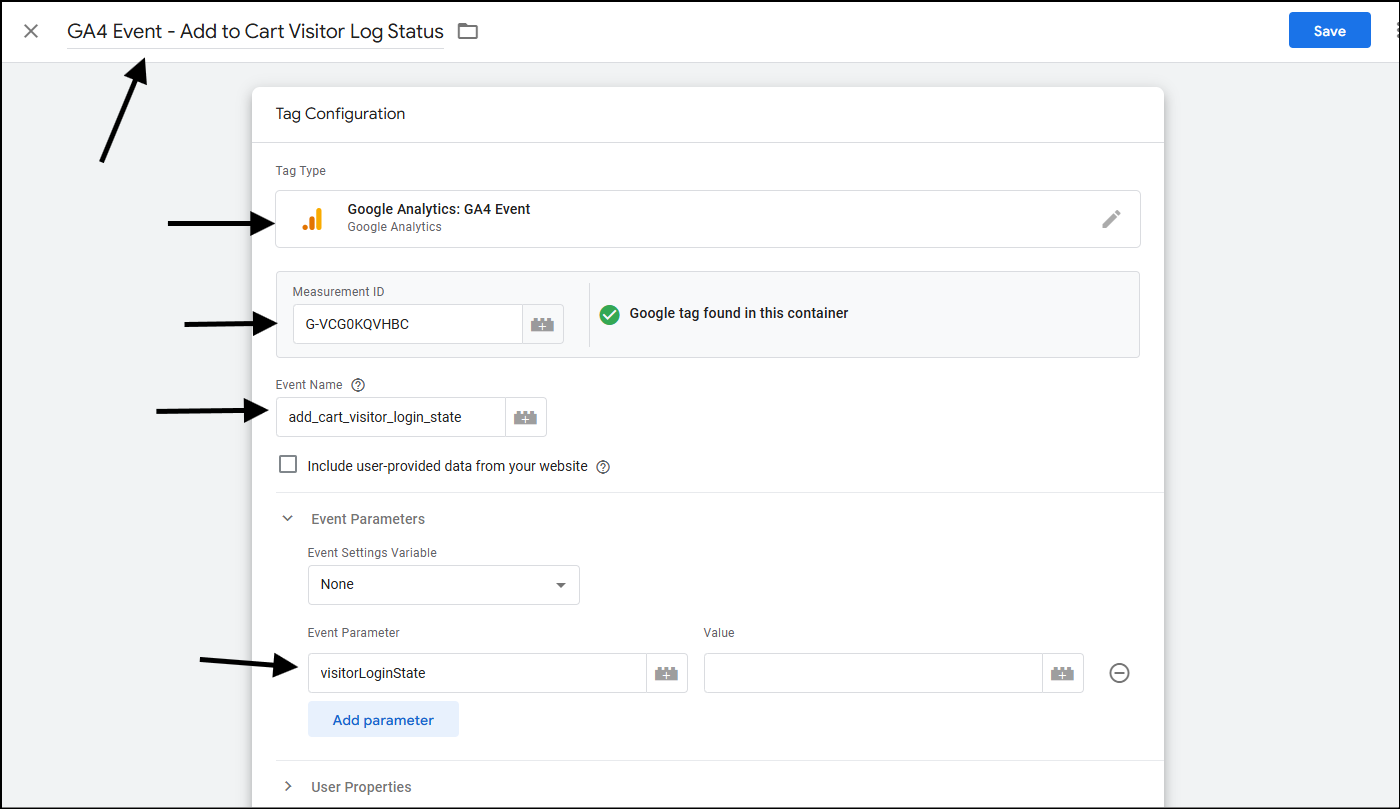
- Name your tag. I’ve used GA4 Event – Add to Cart Visitor Log Status.
- Click on the tag configuration. Select Google Analytics, and then select Google Analytics: GA4 Event.
- It will ask for your measurement ID. Enter the measurement ID. After entering the ID, it should show that your Google Tag is in this container. If not, you need to connect your website with GTM and GA4.
- In the Event name – use the event name that you would like to see in your reports. Remember to use the event naming best practices and keep it under 40 characters.
- I’ve kept the event name as
add_cart_visitor_login_state. It has 28 characters and describes what we’re doing here. - Under event parameters, click on add parameter. This is the information that you want to send with your event. Here, we’ll send the visitor login status.
- Under the event parameter – use the name of the variable from your data layer –
visitorLoginState.
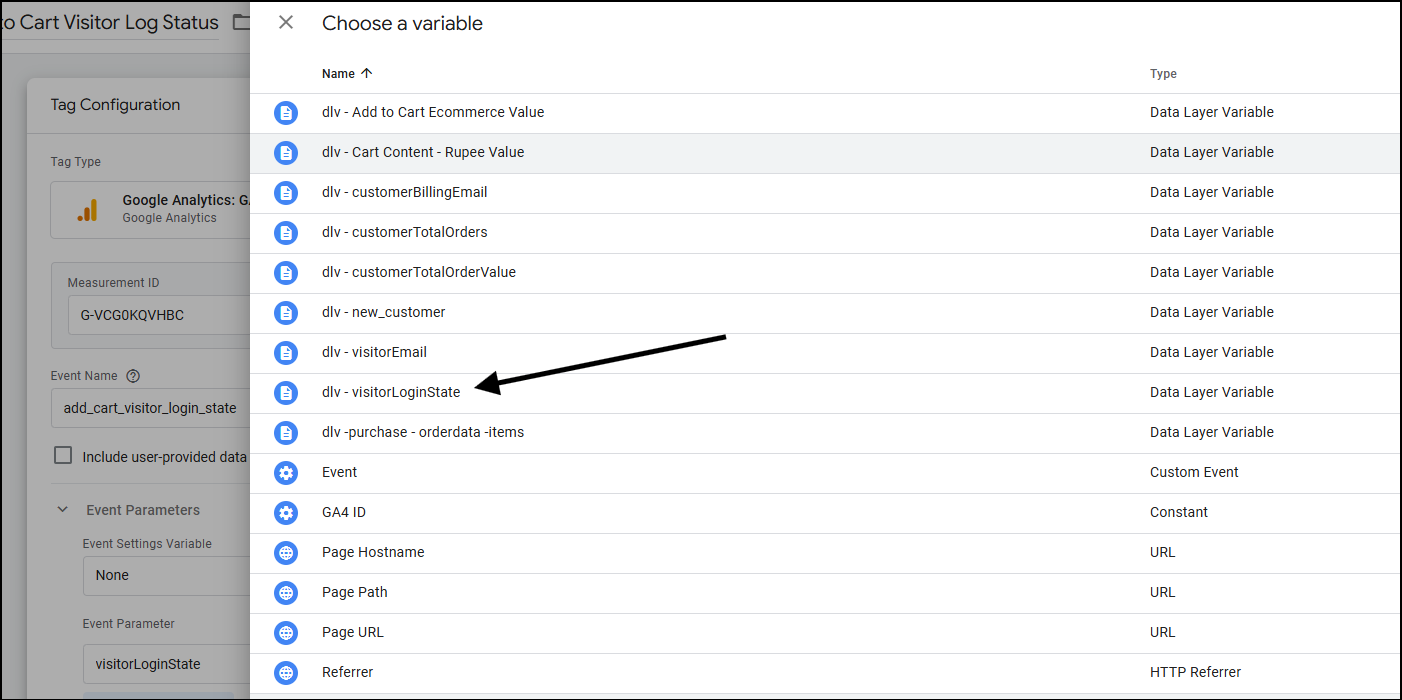
- Under the value, select the plus icon, and select the data layer variable that you have created in GTM –
dlv - visitorLoginState.
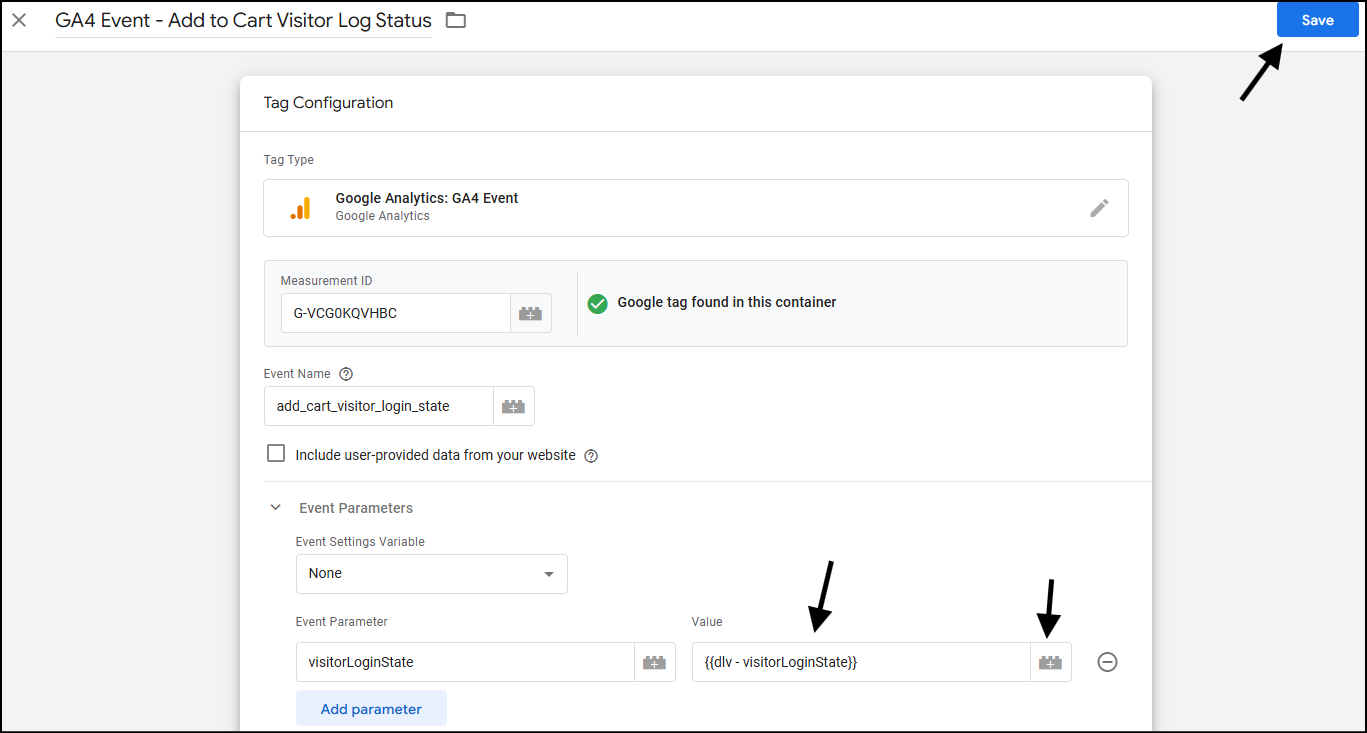
- After you select the Data Layer Variable from the list, you should see the final value in your tag settings as
{{dlv - visitorLoginState}}. This is because in the event parameter, you mentioned the name you will see in the report, and the curly brackets represent the value contained in that variable. In our case, the value will be “logged-in” or “logged-out”.
Your event setup isn’t complete yet.
Now that you’ve learned how to set up tags, we need to discuss when this information (event name and visitor login status) should be sent.
We’ll do that by learning triggers next.
Triggers
Triggers are “when” you want to fire a tag with an event and other information from possibly data layer variables. You can also see them as conditions: “If” this happens, do this.
Continuing from our example above, we want to send the event add_cart_visitor_login_state. However, we must also mention when we have to send this info to GA4. Do we want it whenever someone visits any page or on a particular occasion? The occasion here could be when someone adds a product to the cart.
Using triggers in GTM, we can fire a tag WHEN an event is on the website.
A Quick Recap on How This Figures into a Custom Tracking Setup
- When a visitor comes to the website, he doesn’t log in. He sees a product and adds it to the cart.
- The website sends this information to the data layer.
- GTM can read the data layer. It reads that there is a variable called as
visitorLoginState. - GTM will also see there is an event called as
add_to_cart. (How would it know? We’ll tell it below). - Now, because we’ve configured GTM to fire a tag (GA4 Event) –
add_cart_visitor_login_state, it will send this information to GA4 based on the trigger we define. - We will define the “If” condition as the trigger in GTM. We’ll ask it to fire the tag when GTM sees
add_to_carta custom event in the data layer. - So, essentially,
add_to_carta custom event will trigger our GA4 tag to fire.
How to set up custom events as a trigger in GTM
Go to the trigger section on your GTM and select the New option.

Name your trigger. I’ve named my trigger as Trigger - add_to_cart.
In the trigger configuration, you have multiple options. Choose a custom event as your trigger here.
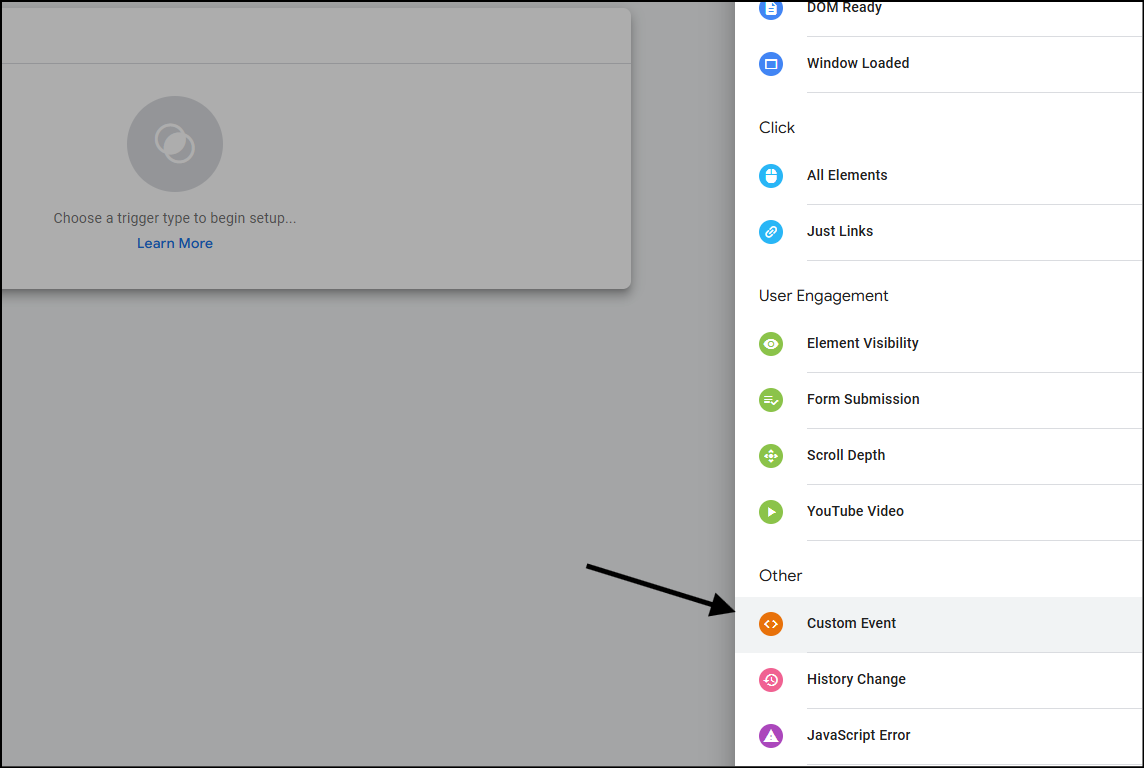
Add the exact event name you see in your data layer.
If you look again at the images, you see that there was this line in the Data Layer:
event: "add_to_cart"

So, our event name here is add_to_cart.
Leave other options as they are, and select save.
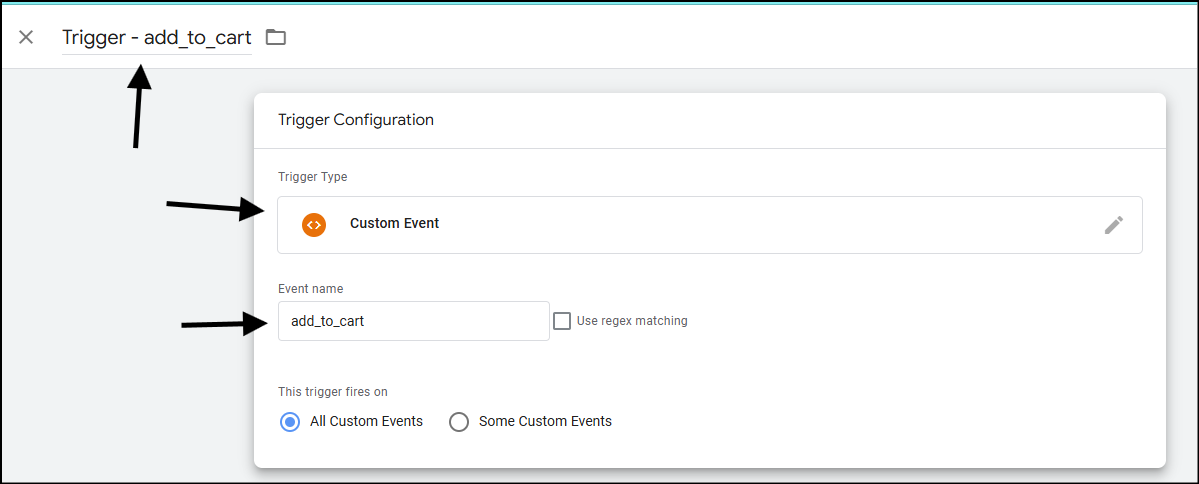
You’ve successfully defined your trigger. You’ve essentially told GTM that whenever this trigger is used – fire a tag (send data to GA4) when the add_to_cart event occurs in the data layer.
Example Tag Setup with Tag, Trigger & a Data Layer Variable
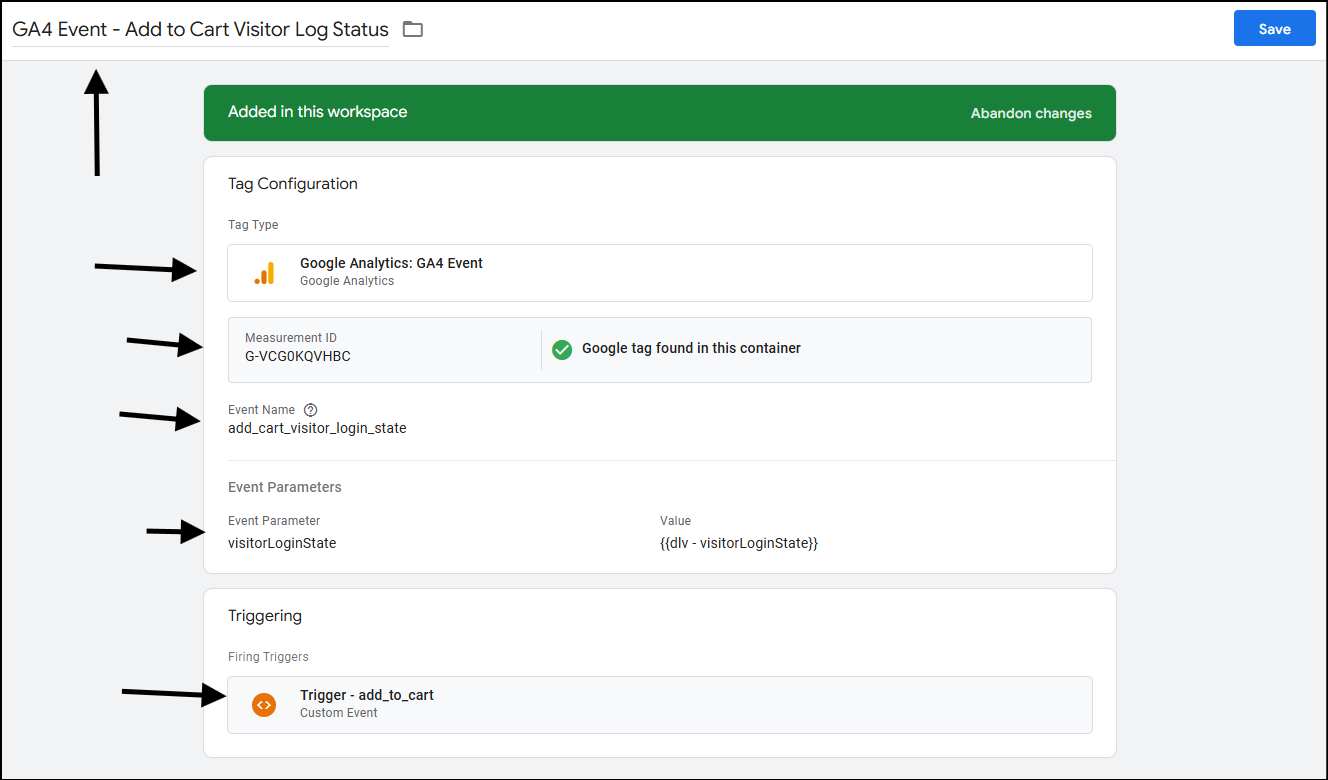
- The tag GA4 Event – Add to Cart Visitor Log Status
- Will send add_cart_visitor_login_state event to GA4
- Along with the data layer variable parameter
dlv - visitorLoginState - When there is an add_to_cart custom event on the website
Next Steps
Previous in the series: Set Up ECommerce Events in GTM for Your WooCommerce Shop
Next: Looker Studio Dashboard for Your ECommerce Shop
Also Read: Tracking WooCommerce Shop Performance using GA4, GTM and eCommerce Events

