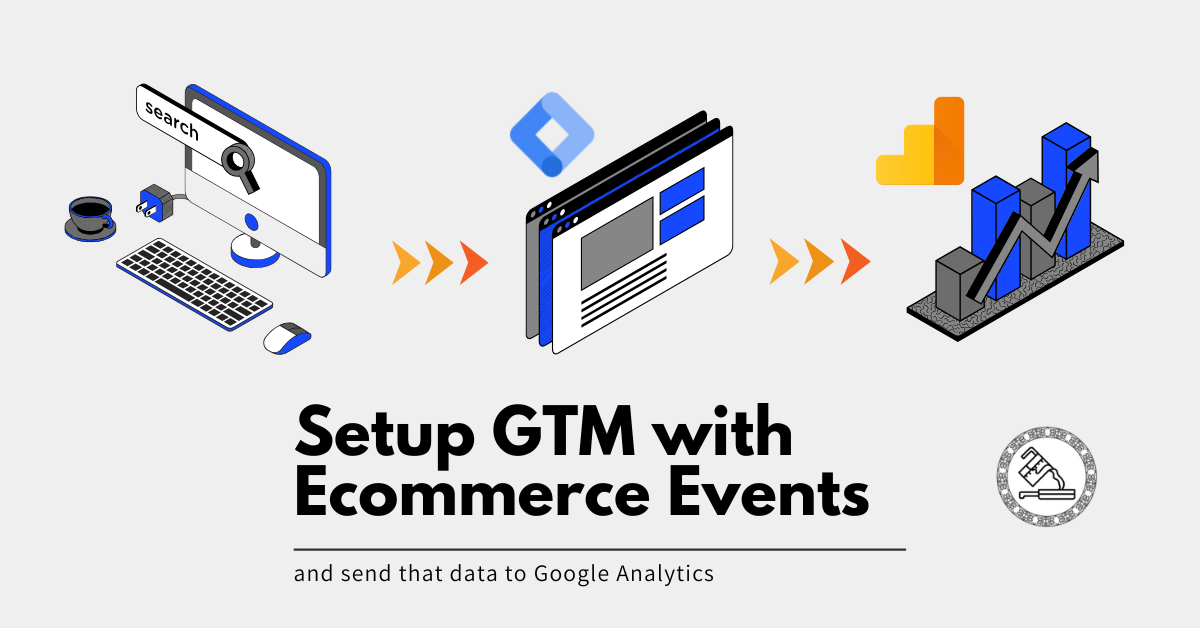
Google Tag Manager (GTM) is an exceptional tool for capturing information from your e-commerce website and sending it to GA4.
With GTM, you can send any information to GA4 through events and event parameters.
Example: When a person adds a product to the cart, you can send that information as an event “add_to_cart” in GA4. Along with it, you can send the product name, value, SKU, item category, brand, variant, quantity, and more.
If you’ve followed my series of posts to set up a simple WooCommerce performance dashboard, you’ll now need to set up your GTM to be able to send that data to Google Analytics.
Quick Recap on How the Tracking Works
- USER ACTIVITY ON WEBSITE: The user engages with your website (e.g., adds a product to a cart or makes a purchase).
- INFO SENT TO DATA LAYER: The website sends that information to a bucket (Data layer), which GTM can read.
- GTM READS DATA LAYER: GTM reads info from the Data Layer, including variables and events you’ve set in GTM.
- GTM SENDS DATA TO GA4: GTM sends info using GA4: Event tag to GA4 based on triggers you set.
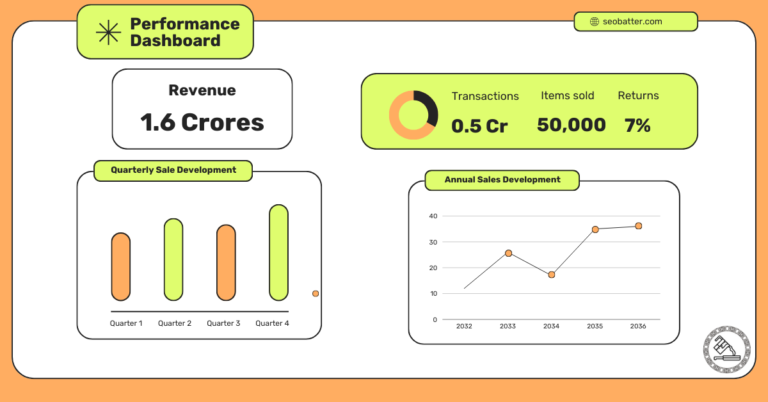
- LOOKER STUDIO IMPORTS GA4 DATA: GA4 is connected with Looker Studio and imports all event data. These can then be used in reports.
- DASHBOARDS AND REPORTS: You can create dashboards and reports using your event data and parameters.
In this post, we will work with points 3 & 4. We’ll teach GTM what information to pick from the data layer and set it up so it sends the required data to GA4.
Recommended ECommerce Events
Google recommends a few e-commerce events, and implementing those can help most of your tracking setup.
| Event | Trigger | What the event is |
|---|---|---|
| add_payment_info | Enter their payment information on the checkout page. | This event tracks when users submit their payment details during checkout. For example, entering credit card details or selecting a payment method like PayPal or UPI. This is crucial for tracking how many users proceed to payment, helping identify drop-offs in the checkout funnel. |
| add_shipping_info | Click the “Proceed to Checkout” button in the shopping cart. | Tracks when users provide their shipping address or choose a delivery method during checkout. For example, fill out fields like name, address, and zip code or choose “Standard Shipping” or “Express Delivery.” It helps understand shipping preferences and conversion behavior. |
| add_to_cart | Clicks the “Add to Cart” button on a product page. | This event tracks when users add an item to their shopping cart. For example, a user clicks “Add to Cart” on a product detail page for a smartphone or a pair of shoes. Essential for monitoring product engagement and interest. |
| add_to_wishlist | Saves an item to their wishlist for later purchase. | Tracks when users save an item to their wishlist instead of adding it directly to the cart. For example, a user clicks “Save for Later” or “Add to Wishlist” on a premium product. Useful for understanding user intent and demand for specific products. |
| begin_checkout | Has their money been refunded for a previous purchase | Tracks when users start the checkout process after reviewing their cart. For example, clicking “Checkout” after finalizing the items in their cart. Indicates strong purchase intent and is a key step in the conversion journey. |
| purchase | They complete their order and reach the confirmation page. | Tracks when users successfully place an order. For example, a user sees the “Thank You” page after completing payment. This event captures the end goal of eCommerce—successful transactions—and is critical for revenue analysis. |
| refund | Has their money been refunded for a previous purchase? | Has their money been refunded for a previous purchase? |
| remove_from_cart | Removes an item from their shopping cart. | It tracks when users delete an item from their cart, such as by clicking the “Remove” or “Delete” button next to a product in the cart. This helps identify reasons for abandonment and optimize the cart experience. |
| select_item | Clicks on a specific product from a list or catalog. | It tracks when users open their shopping cart, such as clicking the cart icon to review items before proceeding to checkout. This helps gauge cart engagement and analyze drop-offs from this point. |
| select_promotion | Clicks on a promotion or ad on the website. | Tracks when users engage with promotional content. For example, clicking on a homepage banner advertising a “Buy 1 Get 1 Free” offer. This helps measure the effectiveness of promotions and ad placements. |
| view_cart | Visits their shopping cart to review selected items. | Tracks when users open their shopping cart. For example, clicking the cart icon to review items before proceeding to checkout. Helps gauge cart engagement and analyze drop-offs from this point. |
| view_item | Opens a product detail page to learn more about the item. | Tracks when users view detailed information about a product. For example, clicking on a product in the catalog to see its price, description, and images. This event helps analyze product-level engagement. |
| view_item_list | Browse a collection of products or search results. | It tracks when users are exposed to promotional content. For example, a user might see a banner at the top of the homepage advertising a limited-time sale. This information is useful for evaluating the reach of promotions. |
| view_promotion | Sees a promotional banner, ad, or offer on the website. | Tracks when users are exposed to promotional content. For example, a user sees a banner at the top of the homepage advertising a limited-time sale. Useful for evaluating the reach of promotions. |
Now, back to how the event tracking works:
- The website sends the events mentioned above to the data layer.
- GTM picks it up.
- GTM sends this information to Google Analytics.
If you’re okay with using the recommended events from Google, the setup will be fairly easy. You can skip the section below if you want to jump directly into the setup.
If you want to send additional events and event information (parameters), you’ll need to set up custom events and learn how the tag manager works.
How Does Google Tag Manager Work?
This is an optional read
These three elements of GTM make it possible to send e-commerce data from your website to GA4:
- Data Layer Variables
- Tags
- Triggers
Read this post to learn how custom event tracking works through tags, triggers, and data layer variables in GTM.
2 Ways to Send E-Commerce Data
There are two ways to send e-commerce data from GTM to GA4:
- Using the send e-commerce data option in GA4: Event tag configuration
- Creating data layer variables and passing those as event parameters in the tag. This requires creating data layer variables for all e-commerce events in GTM and adding those as parameters in each e-commerce event.
We can easily use the first way since we’re using the recommended data layer code for e-commerce events.

You can use the second option if you are sending custom parameters with variable names that differ from the recommended e-commerce object.
Setting up GA4 Events in GTM for your WooCommerce Shop
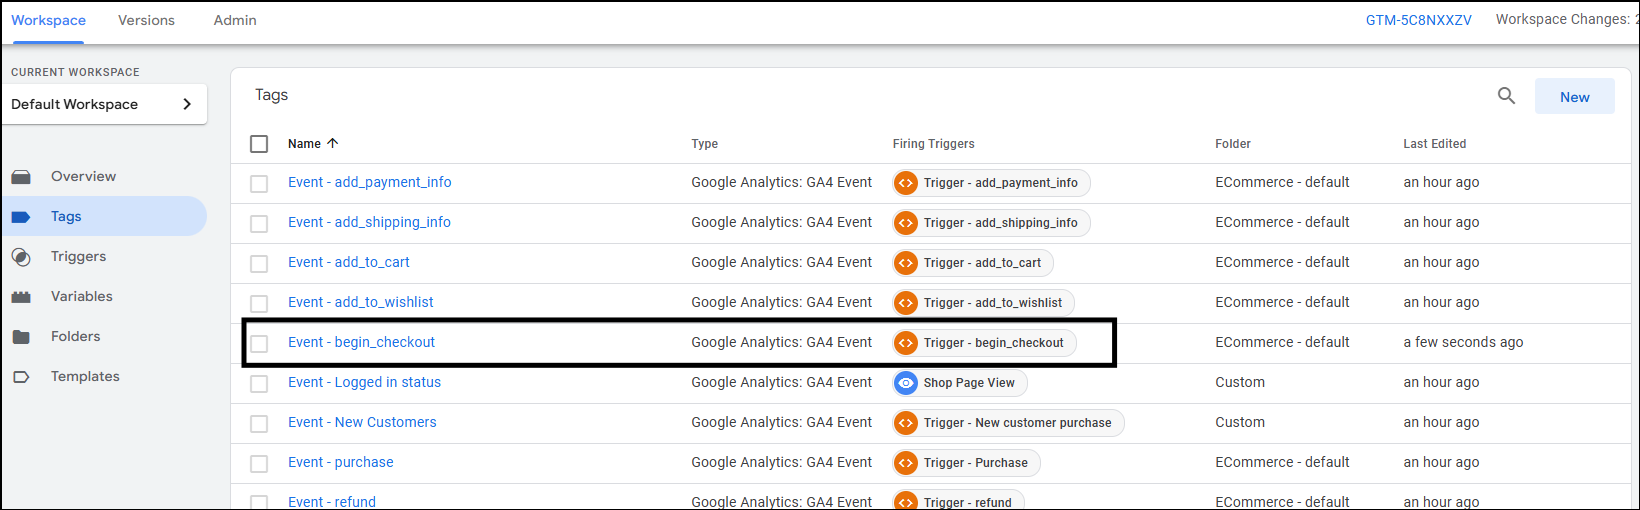
This section’ll set up all the above e-commerce events in GTM. After you’re done with this setup, your GTM account should look like this:
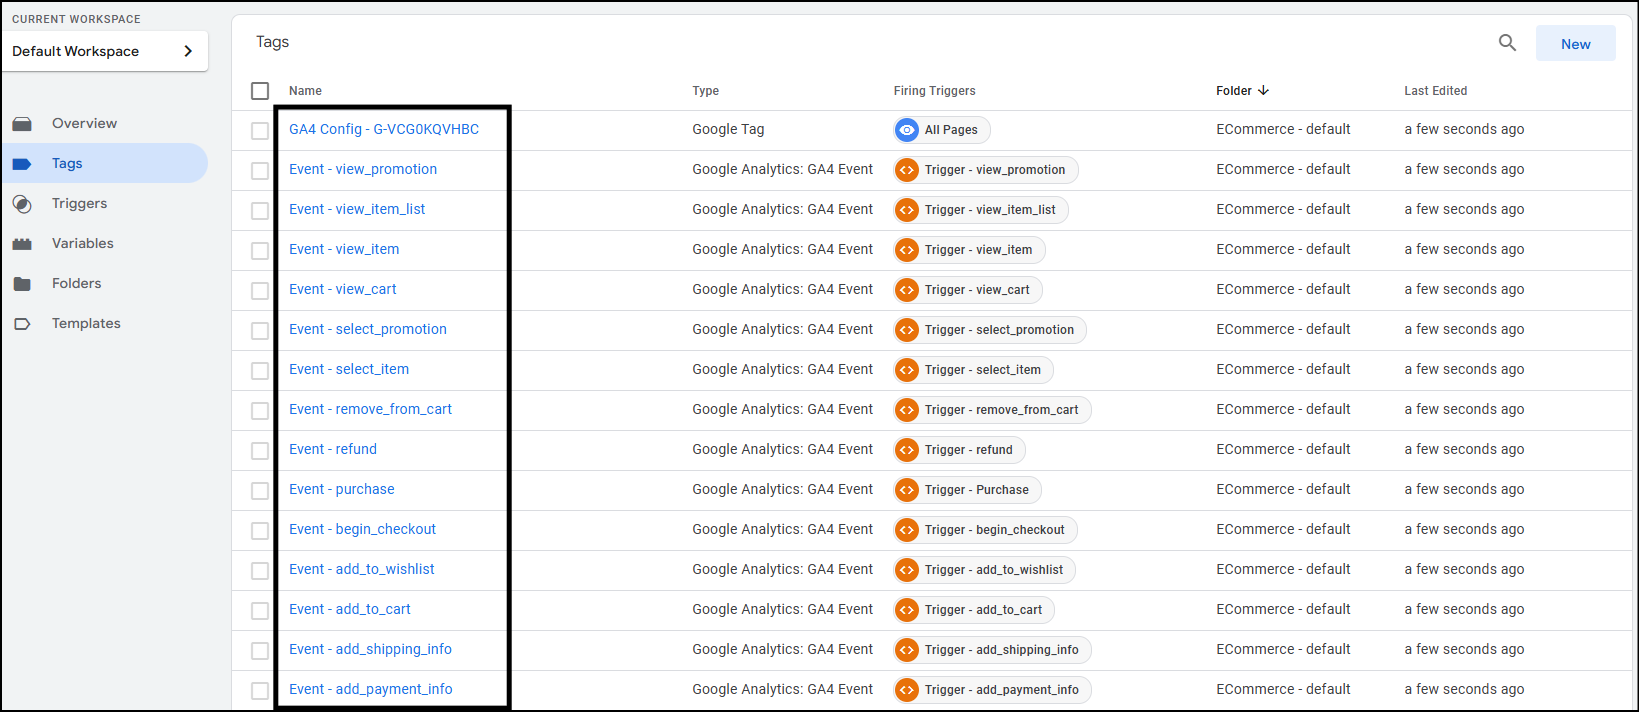
Here’s an overview:
- We’ll set up custom events as triggers to let GTM know when to send the events to GA4.
- We’ll also set up a constant GA4 measurement ID so we don’t have to enter it repeatedly when setting up events.
- We’ll set up GA4: event tag with the same event name as pushed to the data layer and the send e-commerce data option turned on.
Setting up the constant – GA4 ID
Setting up a constant helps in better tag management. This enables us to use this value repeatedly without typing it again. We’ll define the value of constant as our GA4 measurement ID so that we can use it when creating new GA4 Event tags.
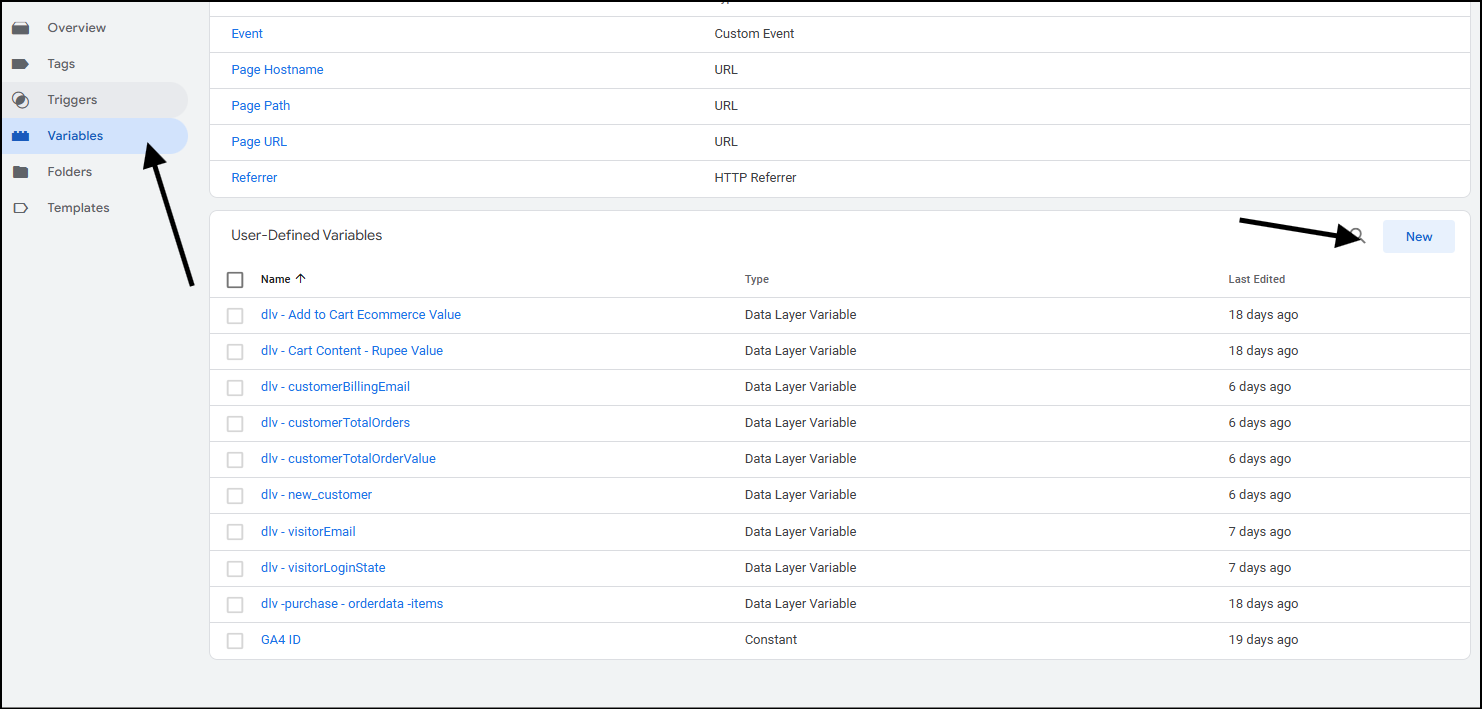
Go to Variables from the left sidebar. Select New.
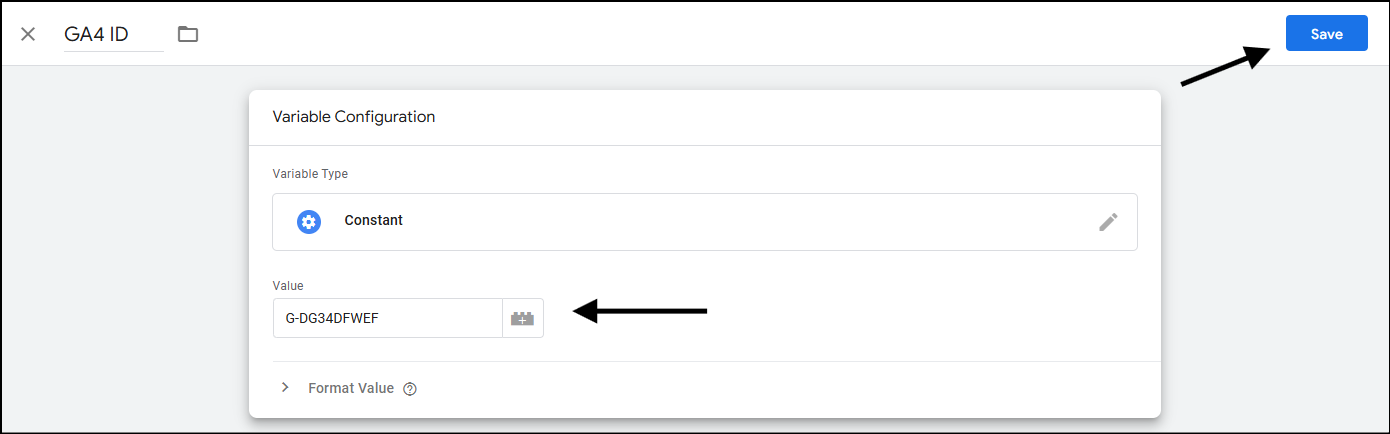
Name your variable. I named mine the “GA4 ID”.
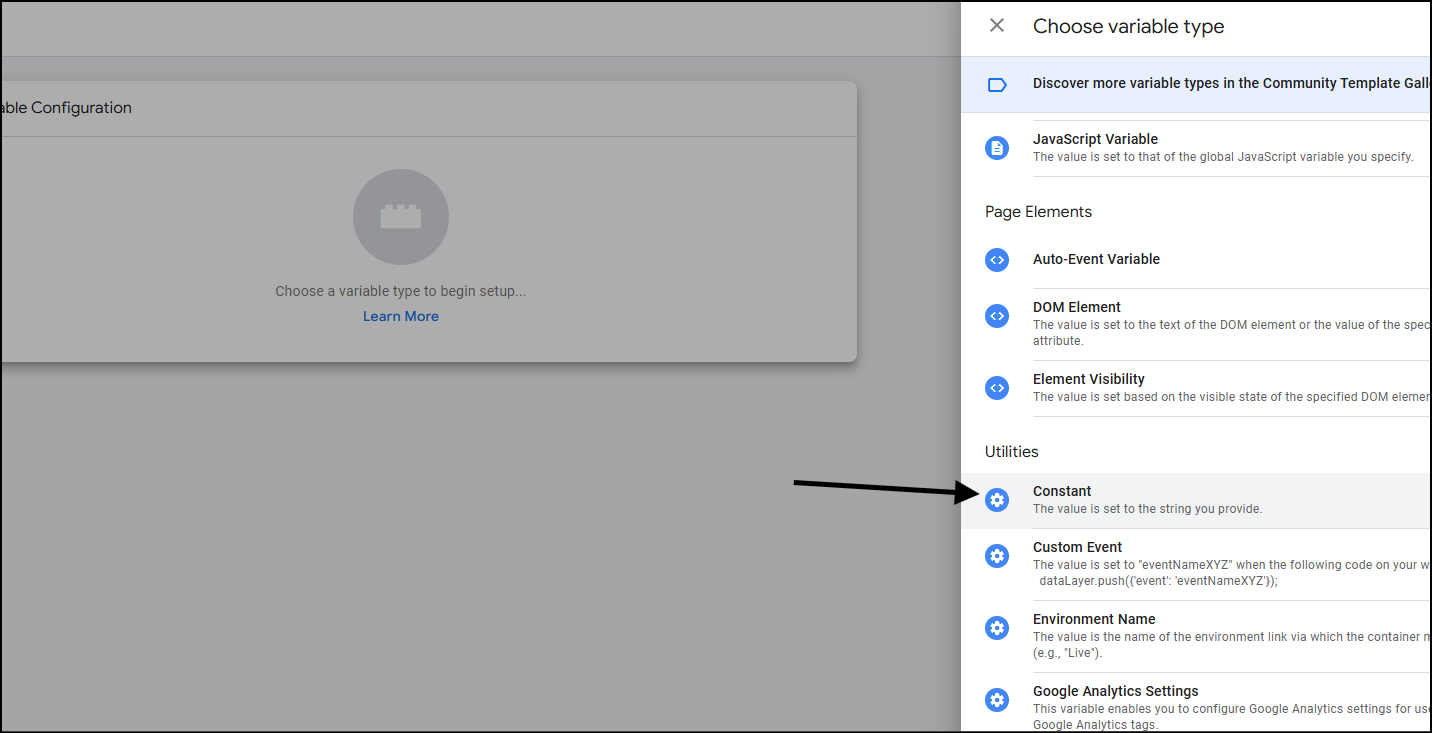
Click the variable configuration, and from the list, select Constant as the option.
Enter your GA4 measurement and click save. We’ll now use this variable while setting up our e-commerce events in Googe Tag Manager.
Setting up the begin_checkout GA4 Event Tag
Let’s set up the begin_checkout tag.
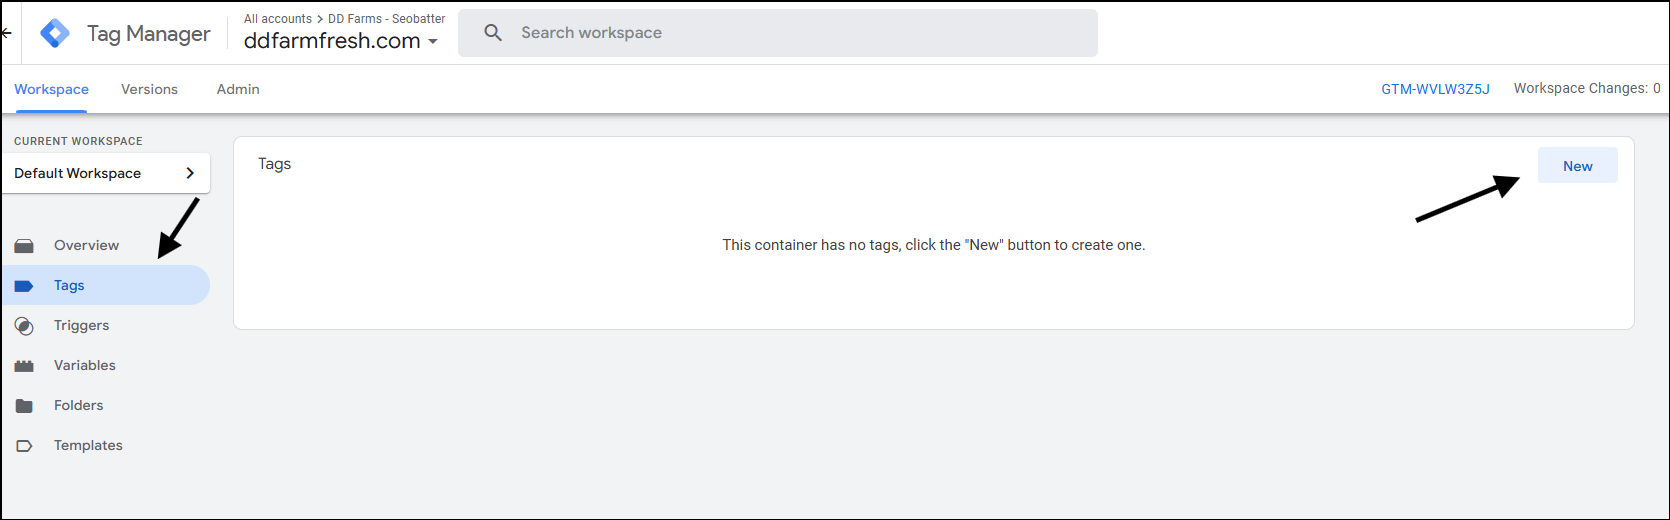
- Go to tags from the left sidebar on your GTM account workspace, and click on new.
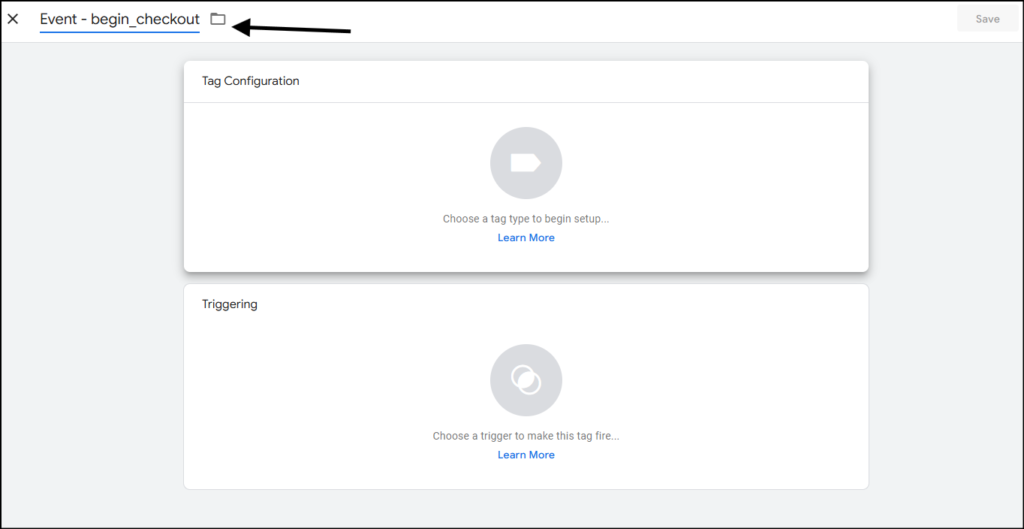
- Name your tag. I’ve used Event – begin_checkout.
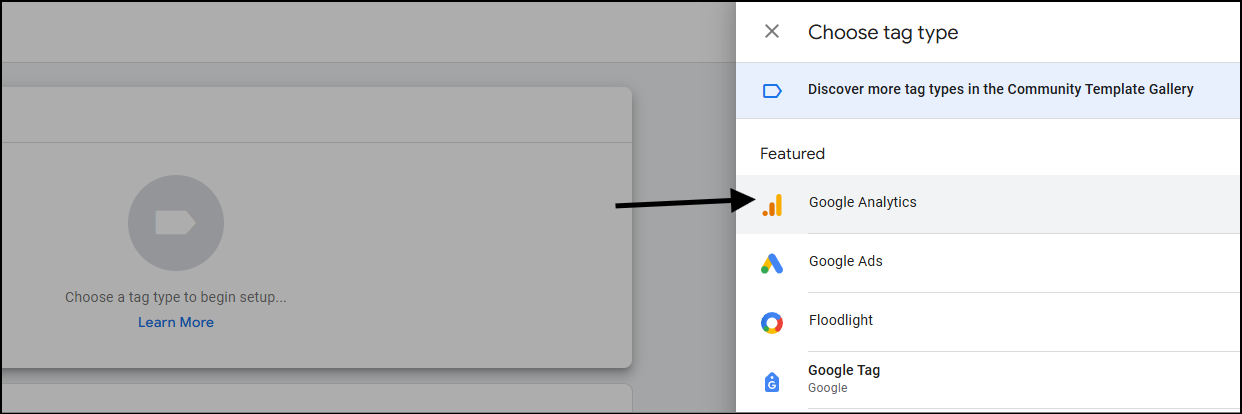
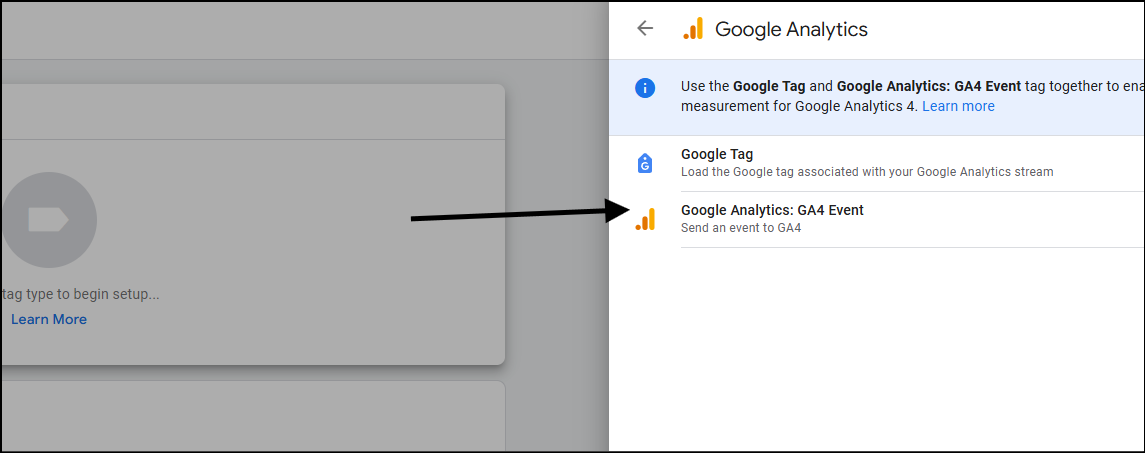
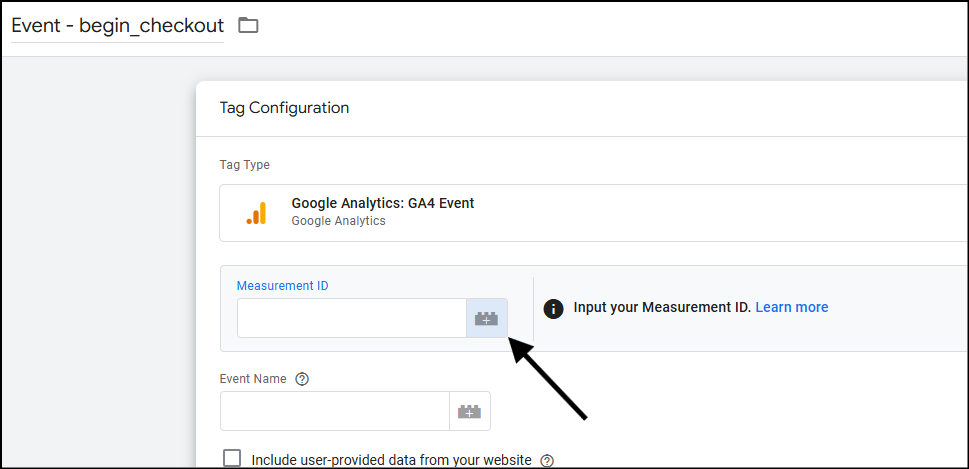
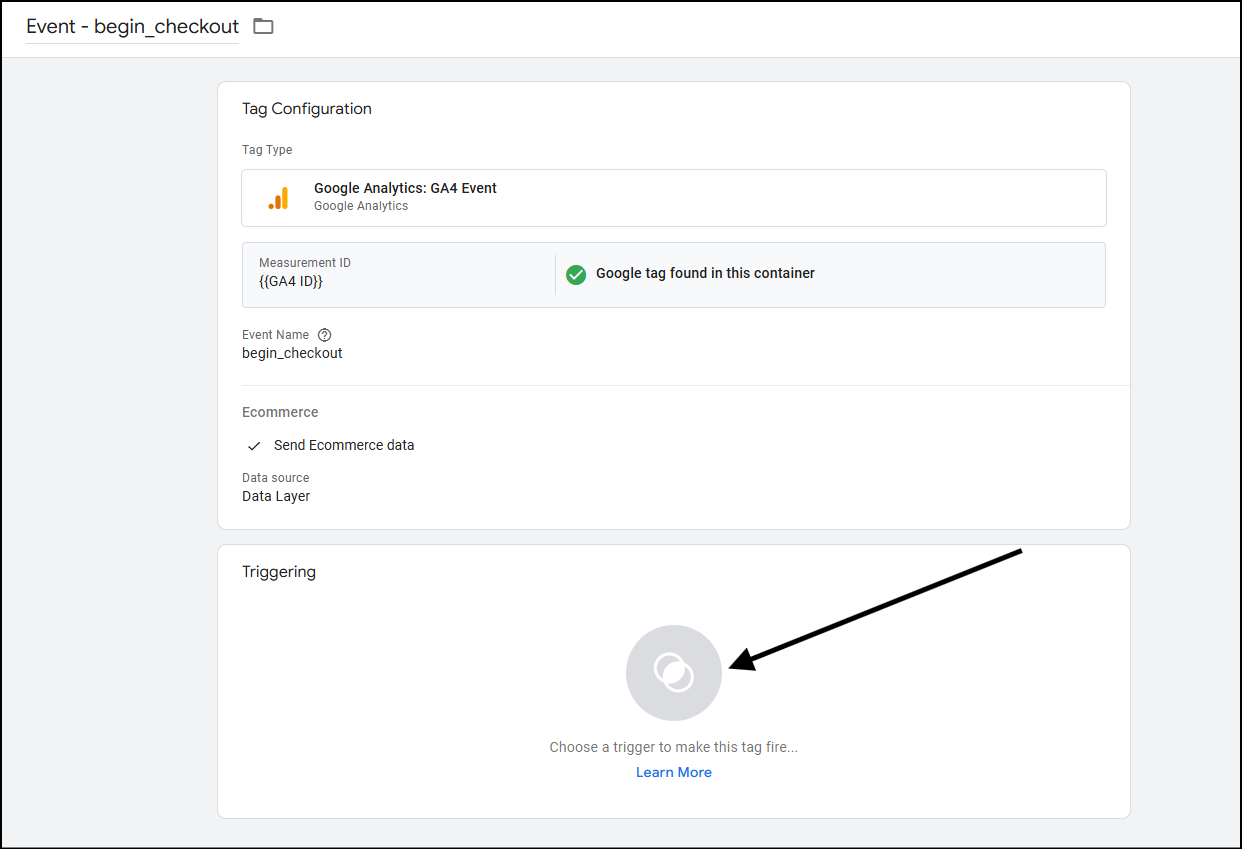
- Click on the tag configuration. Select Google Analytics, and then select Google Analytics: GA4 Event.
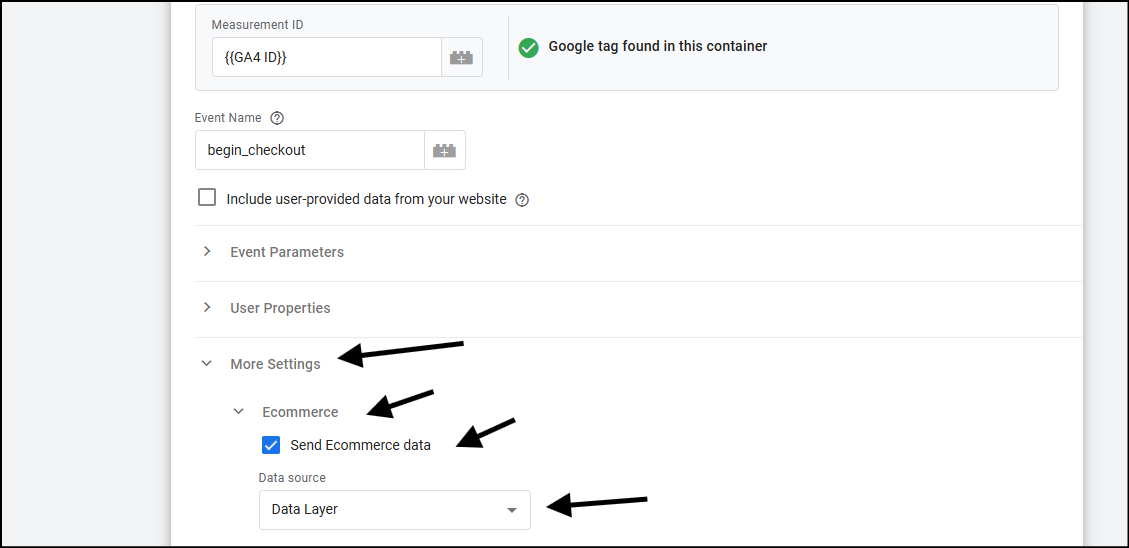
- In the measurement ID, click on the plus icon,
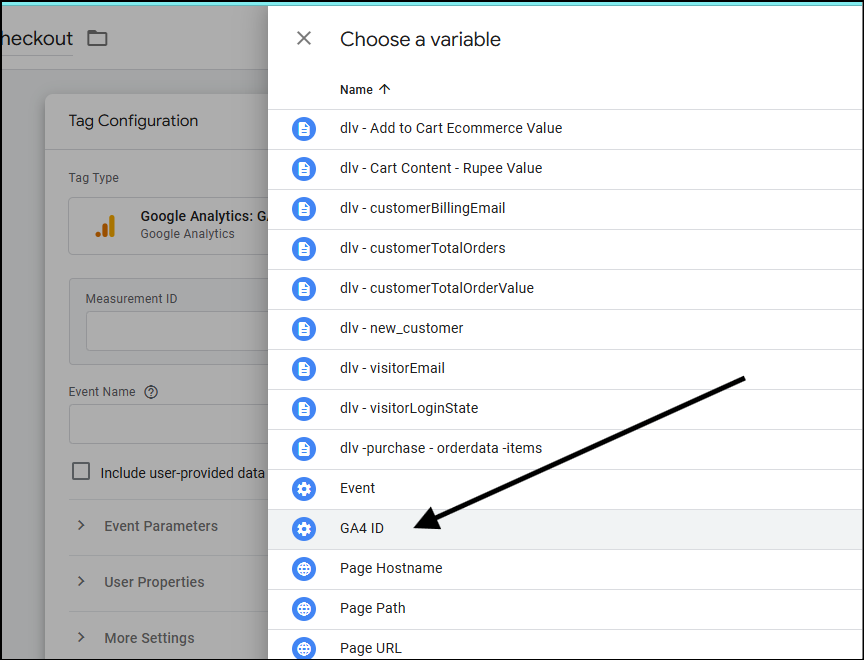
- Select GA4 ID from the list. This is the constant that we created earlier.
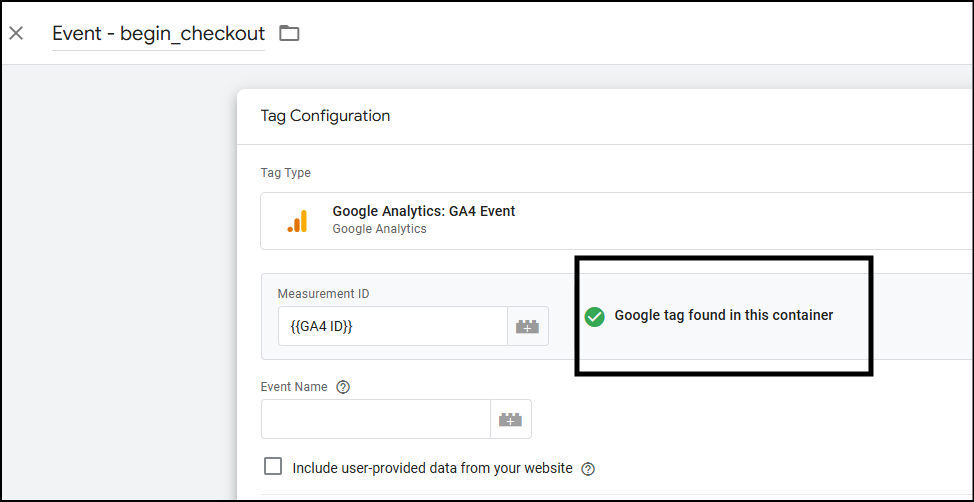
- It should show that your Google Tag is found in this container. If not, you need to connect your website with GTM and GA4.
- In the Event name – use the event name that you would like to see in your reports.
- Since we’re using the Google recommended events, the event name here should be
begin_checkout.
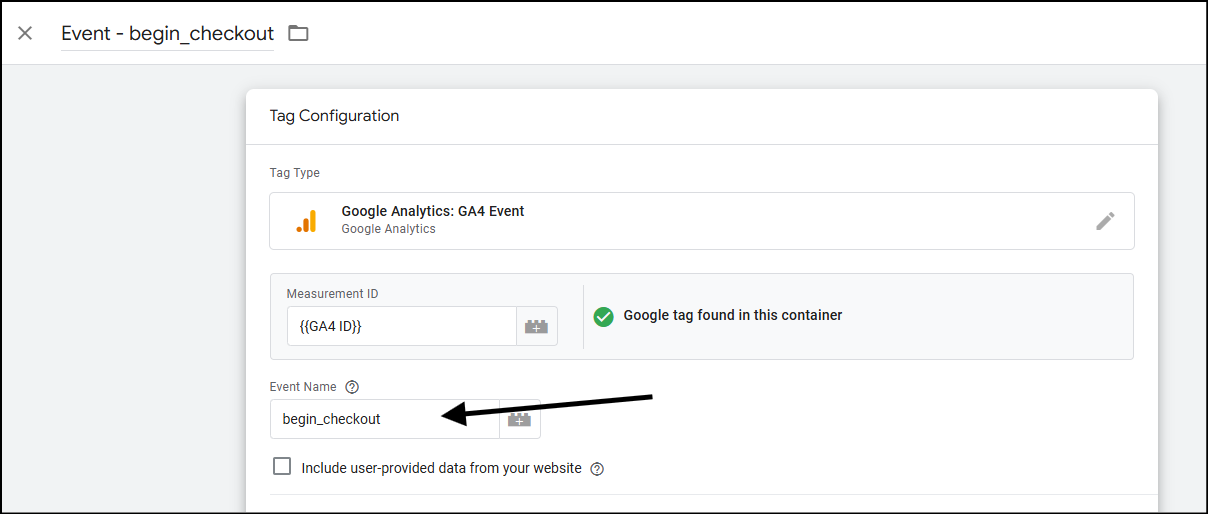
- Expand more settings and expand e-commerce. Tick the “Send E-commerce data” section. Keep the data source as the Data Layer.
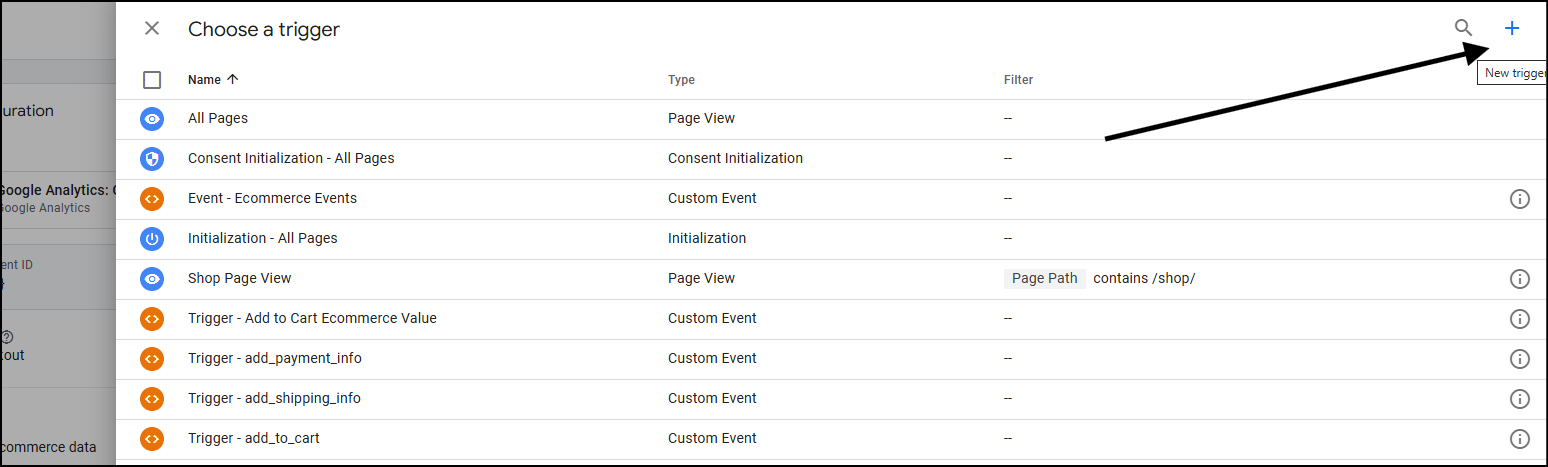
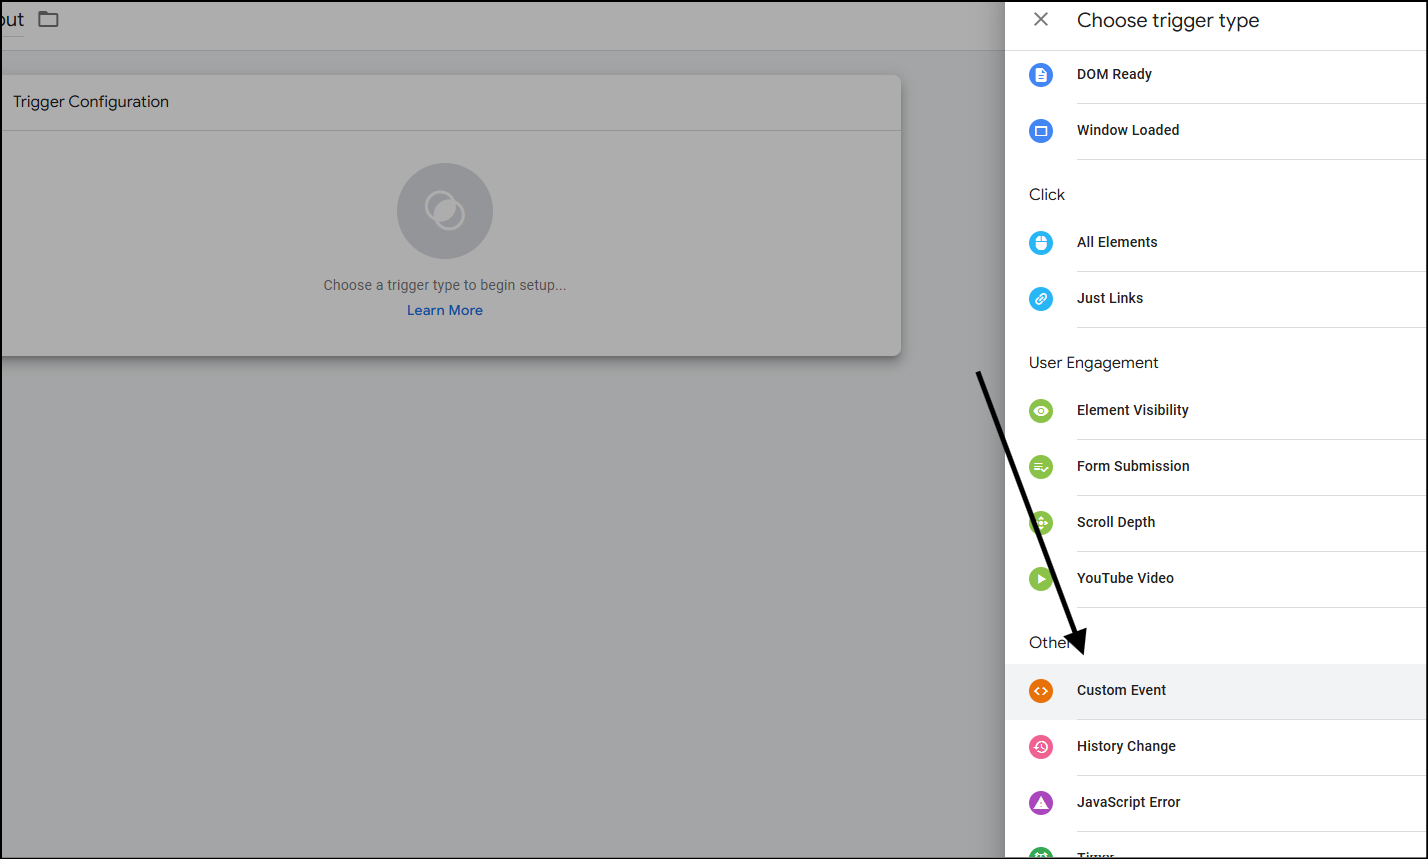
- Now, let’s set up the trigger. Scroll down to the trigger section. Click on Choose a trigger.
- From the section that appears, Select “New Trigger,” which is visible as a plus sign at the top right of the screen.
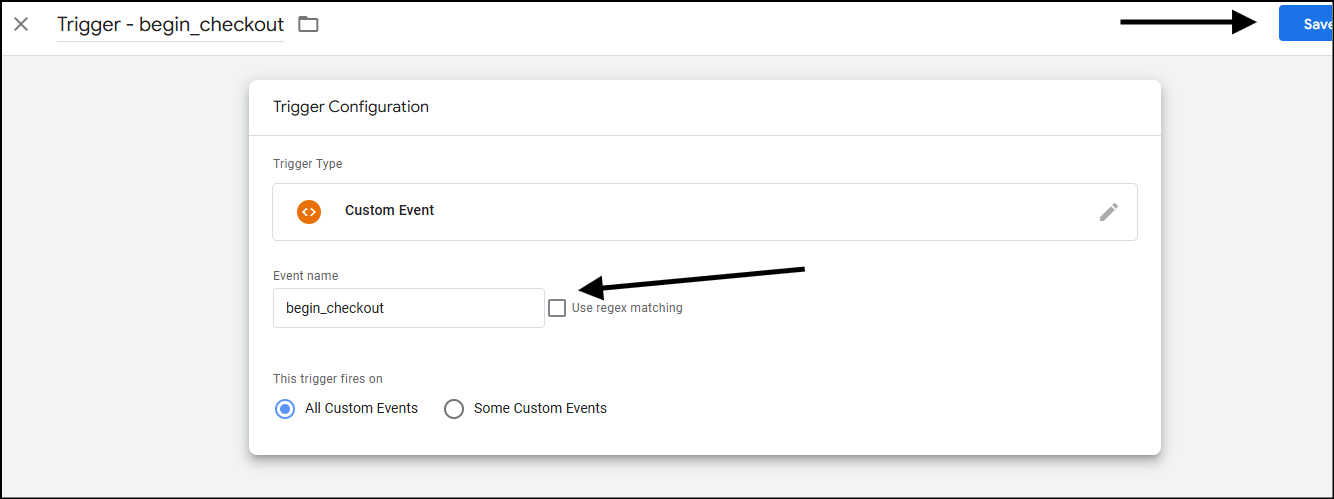
- Name your trigger. I’ve named mine Trigger—begin_checkout. Click on the trigger configuration to select the type of trigger.
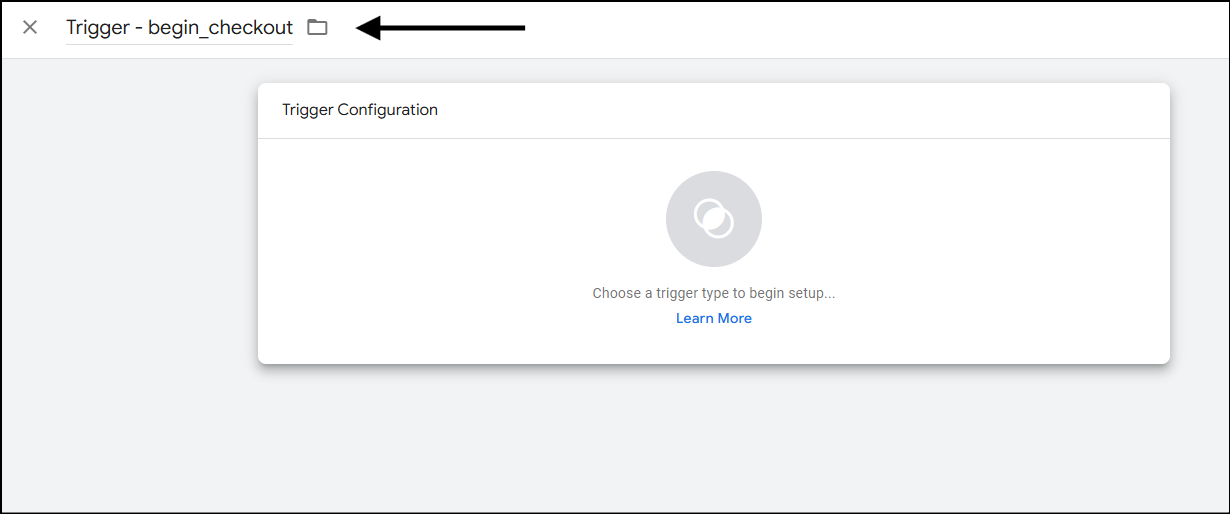
- From the trigger type list, select a custom event as your trigger.
- When the trigger type is selected, you’ll see the event name field. Type in the event name that you want as your GA4 tag trigger. Because the event name in our data layer comes as begin_checkout, we’ll name it so. Click on save.
- After you hit save, you’ll see your tag configuration at a glance. Make sure it matches the image below. Click on save again to save the tag.
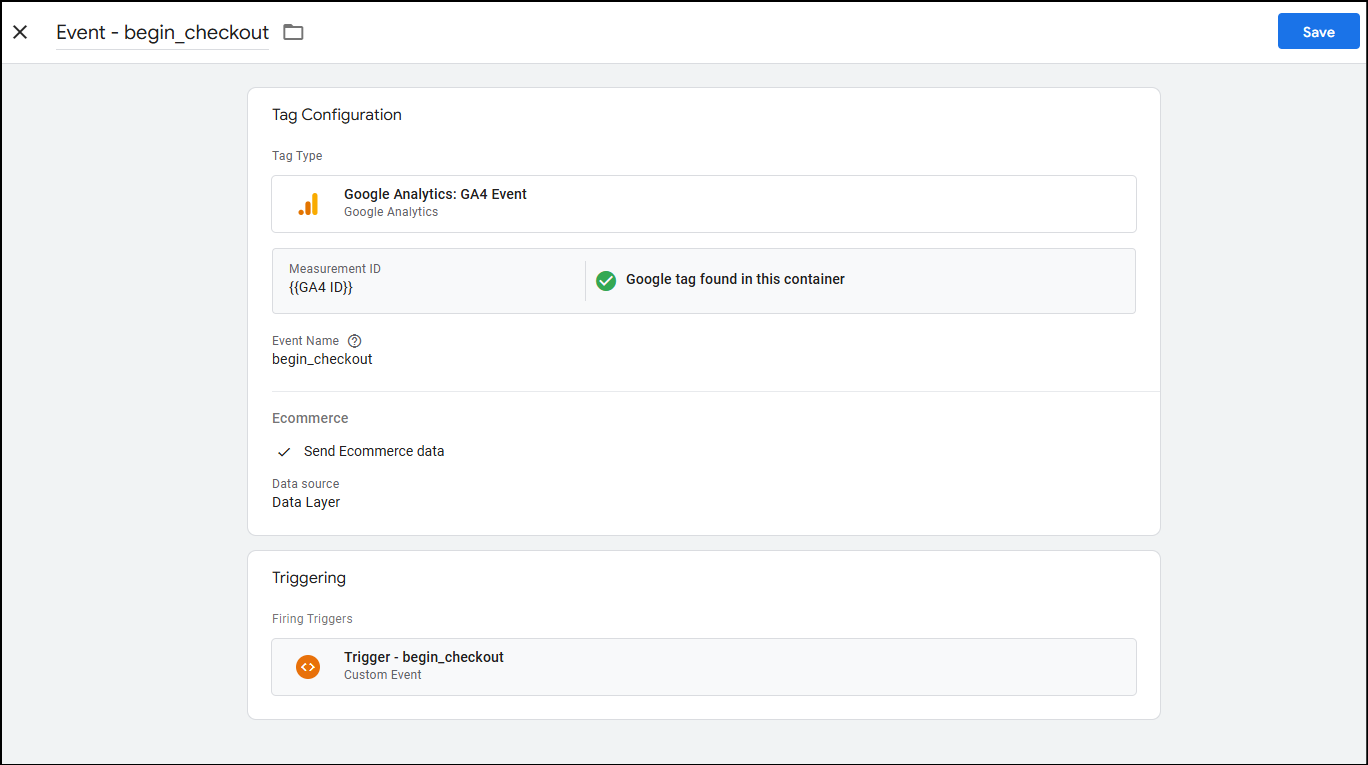
- Now that you’ve saved the tag, you should be able to see the tag in the list on your account.
- Remember to submit the workspace to make your tag live. Alternatively, you can create all tags and triggers and then make a final submission.
Setting up other GA4 Event tags
Use the steps above, and you can set up other tags as well.
Let’s go over another event in short – add_to_whislisht :
- Go to tags from the left sidebar on your GTM account workspace, and click on new.
- Name your tag. I’ve used Event – add_to_wishlist.
- Click on the tag configuration. Select Google Analytics, and then select Google Analytics: GA4 Event.
- In the measurement ID, click the plus icon and select GA4 ID from the list. This is the constant that we created earlier.
- Event name – Since we’re using the Google recommended events, the event name should be add_to_wishlist.
- Expand more settings and expand e-commerce. Tick the “Send E-commerce data” section. Keep the data source as the Data Layer.
- Now, let’s set up the trigger. Scroll down to the trigger section. Click on Choose a trigger.
- From the section that appears, Select “New Trigger,” which is visible as a plus sign at the top right of the screen.
- Name your trigger. I’ve named mine Trigger—add_to_wishlist. Click on the trigger configuration to select the type of trigger.
- From the trigger type list, select a custom event as your trigger.
- When the trigger type is selected, you’ll see the event name field. Type in the event name that you want as your GA4 tag trigger. Because the event name in our data layer comes as add_to_wishlist, we’ll name it so. Click on save.
- After you hit save, you’ll see your tag configuration at a glance. Make sure it matches the image below. Click on save again to save the tag.
- Now that you’ve saved the tag, you should be able to see the tag in the list on your account.
- Remember to submit the workspace for making your tag live
You can set up other events in the same manner:
- add_payment_info
- add_shipping_info
- add_to_cart
- purchase
- refund
- remove_from_cart
- select_item
- select_promotion
- view_cart
- view_item
- view_item_list
- view_promotion
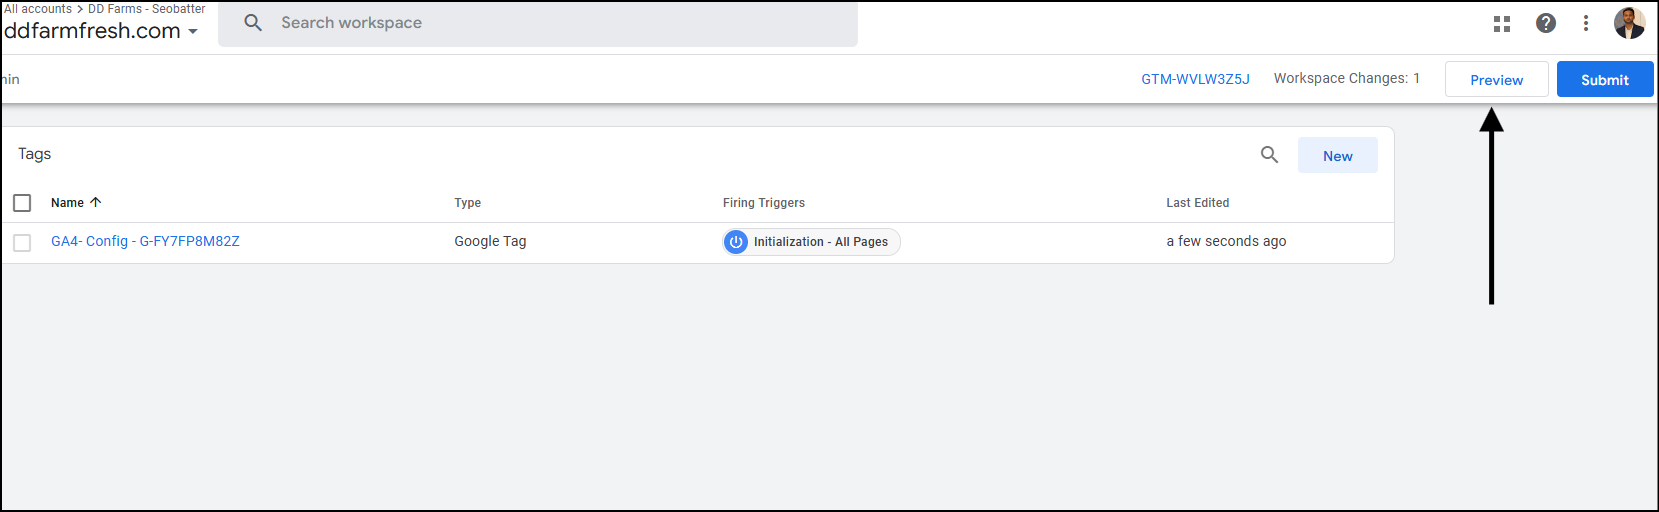
Use GTM preview mode, go to your Google Tag Manager account, and select Preview.
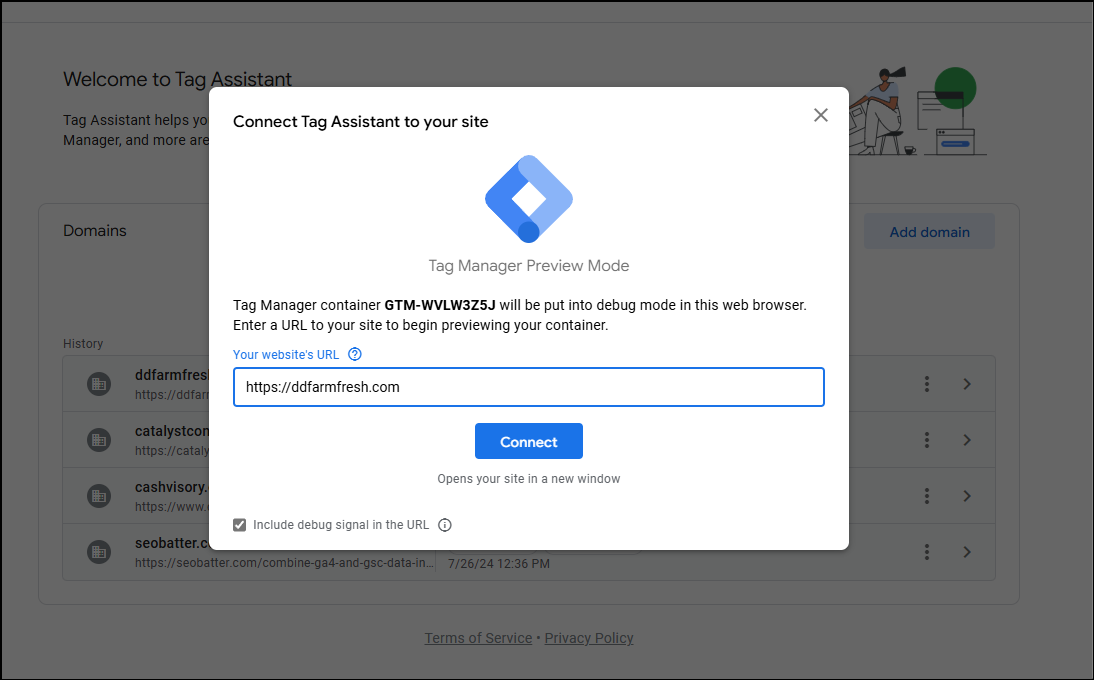
In the tag assistant tab that opens up, enter your website (the one where you’ve connected that GTM account). Click on Connect.
After you hit connect, you’ll see a new window opening your website or a new tab.
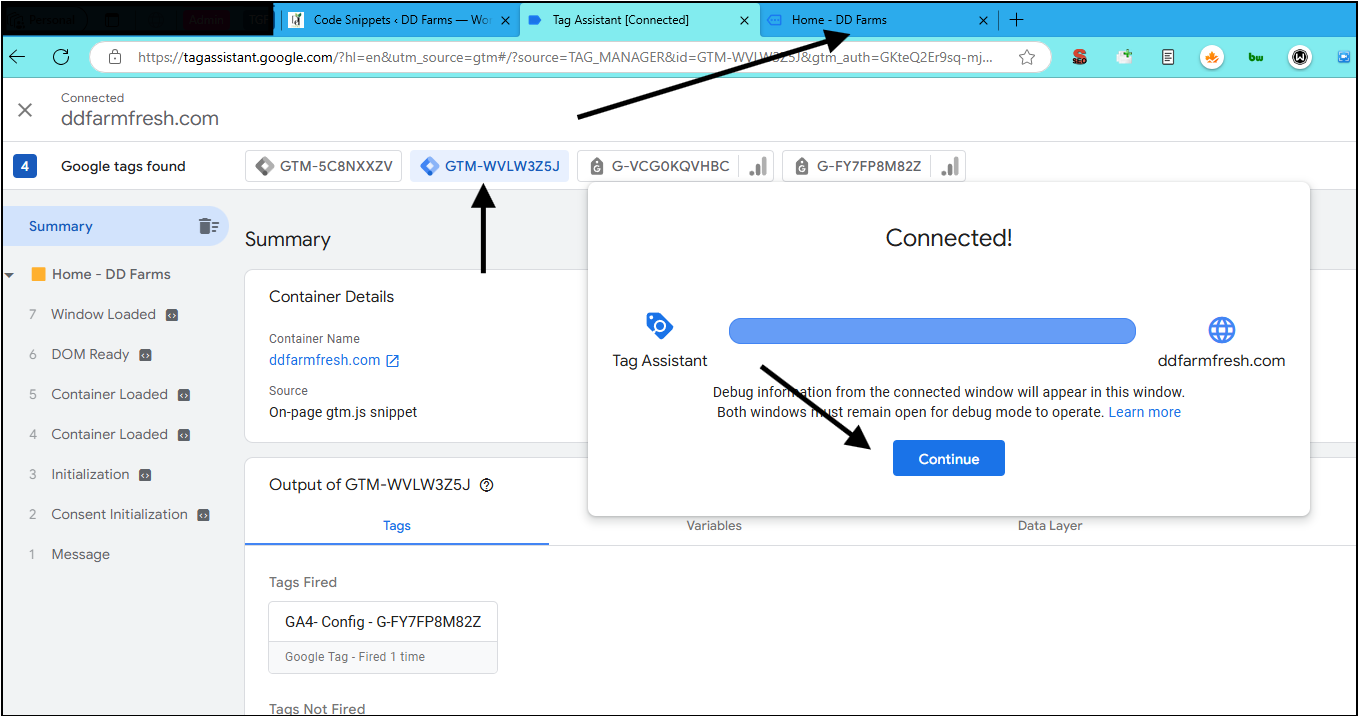
Tip: Make sure your adblockers are off. Sometimes, VPN or other extensions also block ads and tracking scripts, so allow them to see the connection.
Now click continue, and head to the tab where your website is open.
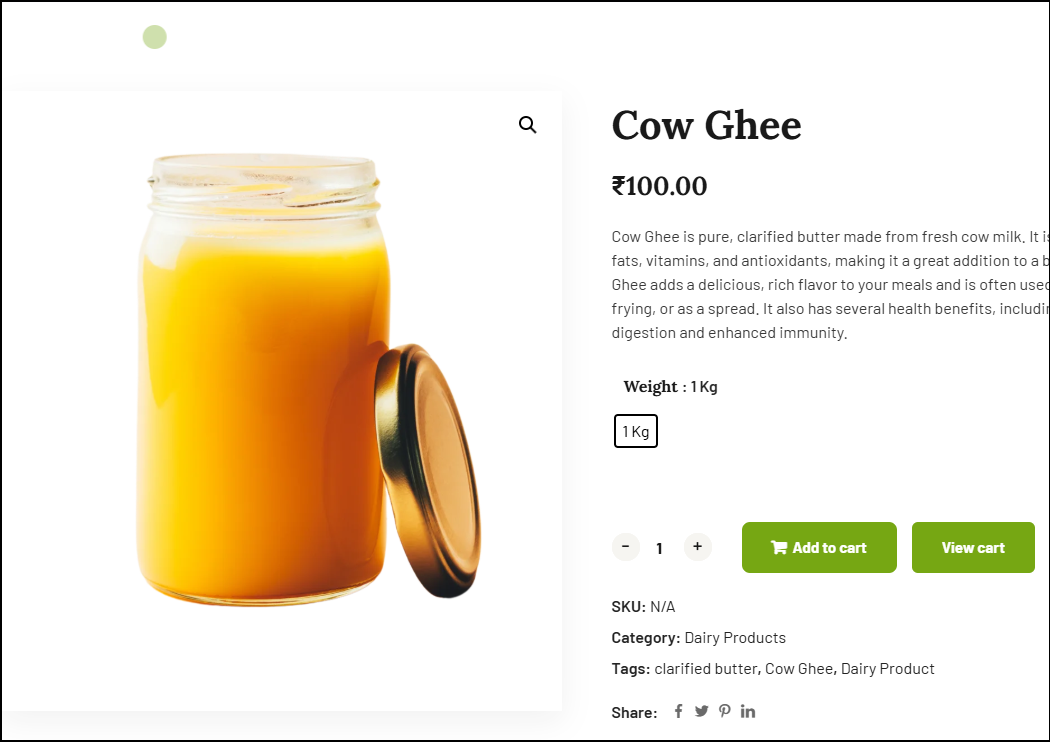
Do a few actions on your site, such as adding a product to the cart.
Head back over to the tag assistant tab. In the left sidebar, you should see the event.”add_to_cart“. Click on the data layer tab to inspect the data layer values.
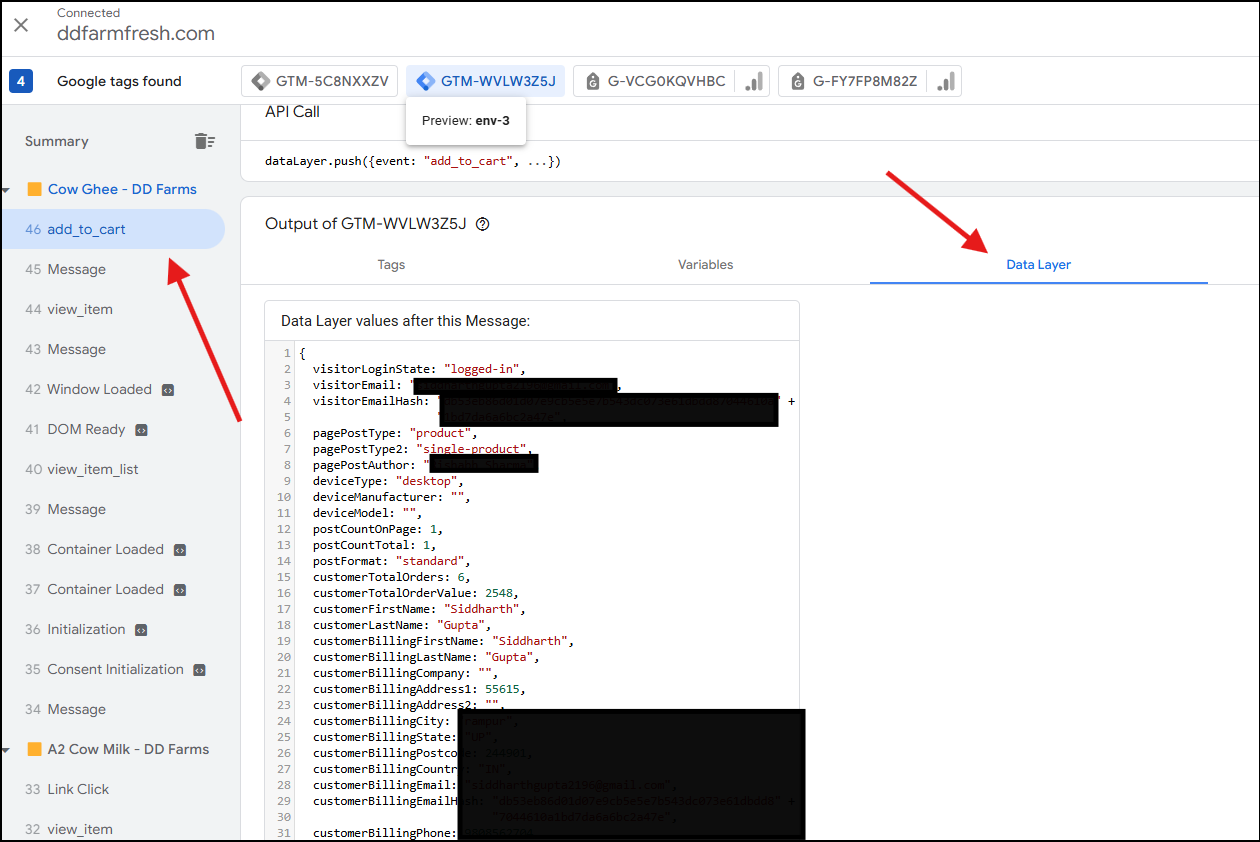
If you scroll, you will also be able to find:
event: "add_to_cart"
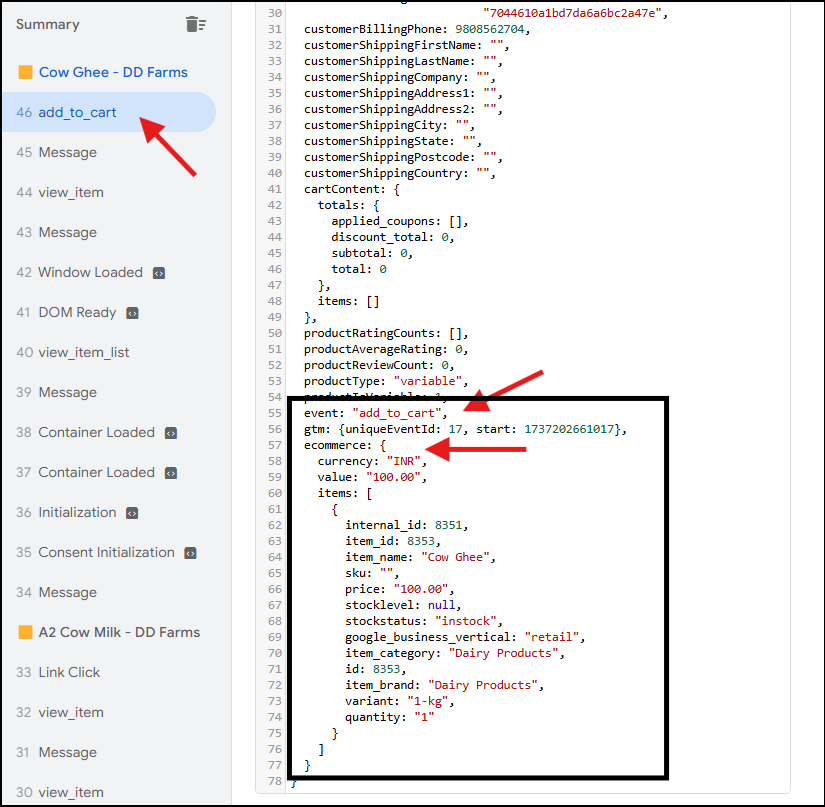
This means that we’re getting add_to_cart as an event in the data layer, and being in the sidebar means that GTM has also identified it as an event.
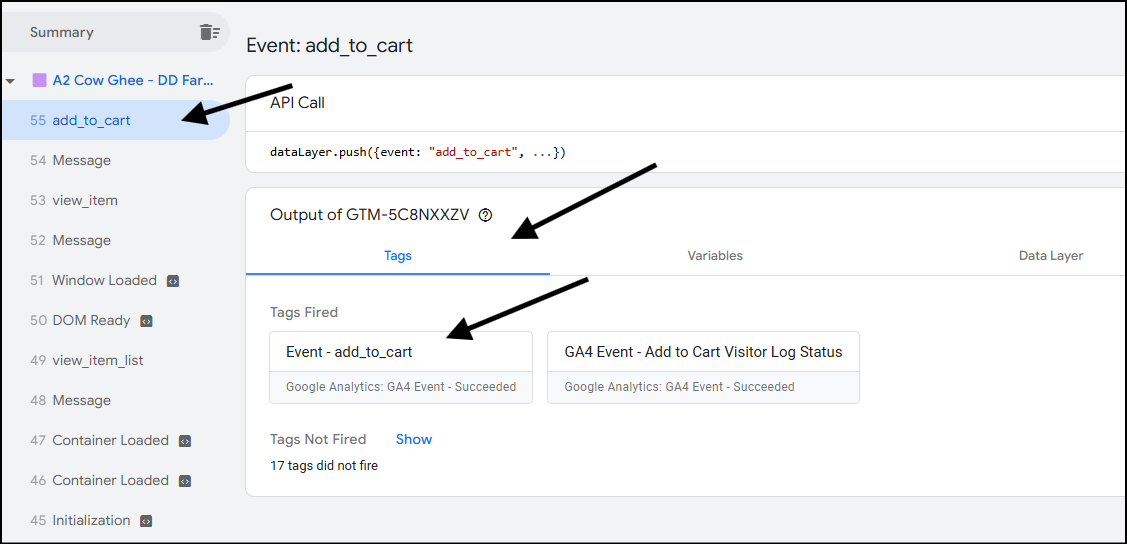
Now let’s see if the tag was being fired (if GTM has sent the event add_to_cart to Google Analytics or not).
For this, go to the Tags tab. From here, you should be able to see the Event—add_to_cart tag being fired.
Test if Google Analytics is receiving Your Events
Follow the same steps as above – use GTM preview mode to see if the tags are being fired.
From your Google Analytics property, go to Admin.
In admin, go to Debugview.
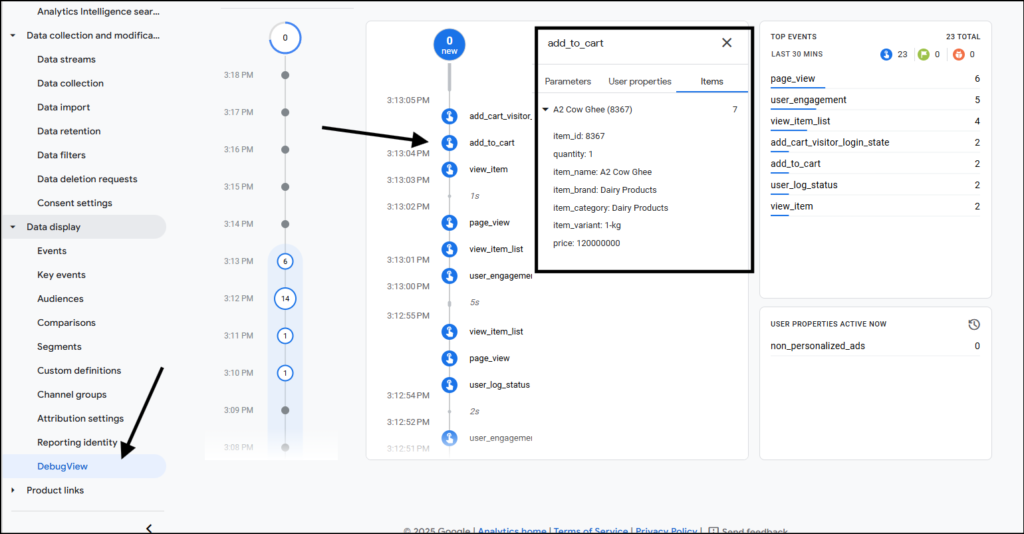
You should be able to see events from your device. Click on the event for more details, such as items and item attributes. This would confirm that you’re able to see your data in GA4.
Next Steps
Previous in the series: Enable WooCommerce Store to Push ECommerce Events to the Data Layer
Next: How Does Custom Event Tracking in GTM Work?
Also Read: Tracking WooCommerce Shop Performance using GA4, GTM and eCommerce Events